

Cooking in Style: How to Illuminate Your Kitchen with Track Lighting
May 16, 2025
Spin It Right—Your Guide to Houston Ceiling Fan Installation Services
May 21, 2025
Restoring Elegance: Why Crystal Chandelier Repair Matters
Crystal chandelier repair guide basics at a glance:
- Safety first: Turn off power at the breaker before any work
- Document everything: Take photos before disassembly
- Assess damage: Identify broken crystals, loose parts, or electrical issues
- Clean components: Use mild solutions (1:3 vinegar to water)
- Repair or replace: Use appropriate adhesives for crystal and metal
- Rewire if needed: Follow electrical codes for safety
- Reassemble carefully: Use your documentation as a guide
- Test thoroughly: Ensure stability and proper function
A crystal chandelier is more than just a light fixture—it’s often the centerpiece of a room, an investment piece, and sometimes even a family heirloom. When damage occurs, knowing how to properly assess and repair your chandelier can save you thousands of dollars while preserving its elegance and value.
Over 80% of crystal chandelier repairs involve replacing missing or broken crystals, while electrical issues account for approximately 60% of all repair requests. The good news? Many common problems can be fixed with the right tools, techniques, and a bit of patience.
Whether you’re dealing with a broken crystal prism, a bent metal arm, or outdated wiring, this comprehensive guide will walk you through the repair process step by step. For complex or valuable antique chandeliers, professional restoration might be the wisest choice—but for many common issues, a DIY approach can yield excellent results.
I’m Michael Eftekhar, and with over 30 years of experience providing lighting solutions at LBX Lighting, I’ve guided countless customers through crystal chandelier repair guide procedures to restore their treasured fixtures to their former glory. My team and I have developed this resource to help you steer the repair process with confidence.

Key crystal chandelier repair guide vocabulary:
– crystal chandelier buying guide
– crystal chandelier installation guide
Why Repair Matters
When it comes to crystal chandeliers, repair isn’t just about fixing something broken—it’s about preserving history, sustainability, and value. Many of our Houston customers have chandeliers that have been in their families for generations. These pieces carry stories and memories that simply can’t be replaced with a new fixture.
“If properly cared for, a chandelier is an investment and an heirloom that can be passed down from generation to generation,” notes one of our restoration specialists. A comprehensive restoration can extend the lifespan of a vintage chandelier by 20-30 years, making your repair efforts well worth the time invested.
From a sustainability perspective, repairing rather than replacing reduces waste and honors the craftsmanship of these exquisite pieces. And let’s not forget the financial aspect—a professional chandelier restoration can cost between $200-$1,000 depending on complexity, while a replacement of similar quality might run $2,000-$10,000 or more.
Crystal Chandelier Repair Guide: Step-by-Step Roadmap
The journey to restoring your chandelier’s brilliance begins with careful assessment. Before you touch a single crystal or loosen any components, take time to truly understand what you’re dealing with.

Assessment and Documentation
Start by examining your chandelier from every angle—ideally while it’s still hanging. Grab a sturdy ladder to get close enough for a thorough inspection, but resist the urge to move anything just yet.
Look closely for missing or broken crystals, bent or broken arms, tarnished metal, damaged wiring, loose connections, and any structural issues with the main body. These observations will form the foundation of your repair plan.
“I always recommend using a voice recorder while on the ladder,” shares one of our museum conservator friends. “It keeps both hands free for examination and ensures you don’t miss anything important in the moment.”
For those tackling more valuable pieces, try using ultraviolet light during your inspection. This clever trick helps detect different glass compositions and can reveal previous repairs or non-original parts—particularly useful when working with antique chandeliers.
To help you decide whether to DIY or call in the pros, we’ve created this handy comparison table:
| Issue Type | Signs | DIY Repair Difficulty | Professional Repair Recommended? |
|---|---|---|---|
| Missing crystals | Empty pins or hooks | Easy | No, unless antique/rare |
| Broken crystals | Visible cracks or chips | Moderate | No, unless valuable |
| Bent metal arms | Asymmetry, wobbling | Moderate | Maybe, if structural |
| Electrical issues | Flickering, non-working lights | Moderate to Hard | Yes, if rewiring needed |
| Frame damage | Structural instability | Hard | Yes |
| Corroded metal | Discoloration, flaking | Moderate | Maybe, if extensive |
Essential Tools for Your Crystal Chandelier Repair Guide
Having the right tools at your fingertips makes all the difference in chandelier repair. After helping countless customers at LBX Lighting, here’s what I consider essential:
For safety, you’ll need cotton gloves (fabric can snag on delicate parts), safety glasses, and a sturdy step ladder. Document everything with a digital camera and notepad. When disassembling, reach for needle-nose pliers and small screwdrivers.
Cleaning requires lint-free cloths and a mild detergent solution. For repairs, have instant glass glue and thin superglue with accelerator on hand. Don’t forget a multimeter for electrical testing and craft foam blocks to support delicate pieces during repair.
Here’s a little secret from our workshop: “For emergency metal repairs, mix very fine sand with thin superglue and accelerator to create a surprisingly strong ‘weld’ that can be painted to match the original finish.” This trick has saved many a chandelier arm when replacement wasn’t an option!
Safety Checklist in This Crystal Chandelier Repair Guide
When it comes to chandelier repair, safety isn’t just a suggestion—it’s absolutely essential. These beautiful fixtures combine several hazards: electricity, fragile glass, height, and sometimes significant weight.
Always begin by turning off power at the circuit breaker, not just the wall switch. Then verify the power is truly off using a non-contact voltage tester before touching any wires.
Your ladder setup matters tremendously—use a sturdy ladder with a helper to stabilize it if possible. Place thick blankets or towels under your work area to catch and cushion any falling parts.
Be mindful of weight—some chandeliers exceed 50 pounds, so enlist help for removal. Work in a well-ventilated area when using adhesives, and protect your hands with cotton gloves for crystal handling and leather when working with wires. Always wear safety glasses to protect your eyes.
According to Scientific research on chandelier conservation, improper handling causes about 25% of accidental chandelier damage reported to restoration companies. A little caution goes a long way in preserving both your chandelier and your safety!
With proper assessment, the right tools, and safety measures in place, you’re well on your way to bringing your crystal chandelier back to its sparkling best. The careful preparation you do now will make all the difference in achieving a professional-quality restoration.
Disassembly, Cleaning & Preparation
Taking apart your chandelier might seem intimidating, but with the right approach, it can be quite manageable. As one of our restoration experts often tells clients, “You may find yourself scratching your head over a mound of parts without a diagram” – so let’s make sure that doesn’t happen to you!

Before you begin, create a soft landing zone beneath your chandelier using thick blankets or towels. This simple step protects both your flooring and any delicate pieces that might accidentally slip from your grasp during the process.
The secret to successful reassembly begins before you remove a single crystal. Take multiple photos from different angles – you’ll thank yourself later! For more elaborate fixtures, consider recording a video walkthrough as you disassemble. I’ve had customers tell me these photos saved them hours of frustration later.
When removing components, work from the outside in and from the bottom up. This methodical approach prevents you from accidentally bumping and breaking inner pieces. Keep small zip-top bags and numbered tags handy for labeling everything as you go. Drawing a simple diagram showing where each component belongs can be incredibly helpful, especially for complex fixtures.
“Remove only what you need to,” advises one of our professional restorers. “If you’re repairing just one section, there’s no need to disassemble the entire chandelier.” This practical advice has saved many of our customers unnecessary work.
Best Practices for Gentle Cleaning
A thorough cleaning should happen before any repair work begins. Dirt and grime aren’t just unsightly – they can hide damage and prevent adhesives from forming proper bonds.
For crystal elements, mix a gentle solution of 1 part white vinegar to 3 parts distilled water, or 1 part isopropyl alcohol to 3 parts distilled water. Never spray solution directly onto the fixture – always apply to a cloth first to prevent dripping onto electrical components.
If you’ve removed crystals for cleaning, you can briefly soak them in your cleaning solution, then rinse in hot water. A plastic colander works wonderfully for rinsing multiple small pieces at once. Air drying on a lint-free cloth is best, though surprisingly, cheap paper towels often leave less lint than expensive “lint-free” cloths!
When it comes to the metal frame, start with a gentle dusting using a soft brush. Follow with a slightly damp cloth using the same cleaning solution you used for the crystals. Avoid commercial brass cleaners on chandelier frames – they’re often too harsh and can damage the finish.
“The pH of any cleaning solution should not exceed 9 to avoid glass dissolution,” a conservation expert once told me. This advice is particularly important if you’re working with antique lead crystal, which is more sensitive to chemical damage than modern crystal.
For more detailed information on cleaning techniques, our guide on how to clean a chandelier offers additional tips and tricks we’ve learned over our 30+ years in the lighting business.
Pre-Repair Surface Prep
Once everything is clean and dry, proper surface preparation is essential for successful repairs:
Start by degreasing all bonding surfaces with isopropyl alcohol on a cotton swab. Any oils – even the natural oils from your fingers – can prevent adhesives from sticking properly. If you find old adhesive, gently remove it using a wooden toothpick to avoid scratching the crystal or metal.
Take time to check for corrosion, especially around pins and metal connections. If you find corroded copper pins, replace them with brass ones. As one museum conservator explained to me, “Annealed copper pins undergo stress corrosion over centuries and must be replaced with brass pins.” This is particularly relevant for antique chandeliers, where original pins may be creating structural weakness.
Prepare your work area by covering it with clean white paper – this makes it much easier to spot tiny parts. Then arrange all components in the order of reassembly. This simple organizational step can make the repair process flow much more smoothly.
At LBX Lighting, we’ve guided countless Houston homeowners through this process, and we’ve found that careful preparation makes all the difference between a frustrating experience and a satisfying restoration. With your chandelier now disassembled, cleaned, and prepared, you’re ready to move on to the actual repair techniques.
Repair Techniques for Crystals, Glass & Metal
With everything clean and prepared, you’re ready to begin repairs. The techniques you’ll use depend on the materials and type of damage.

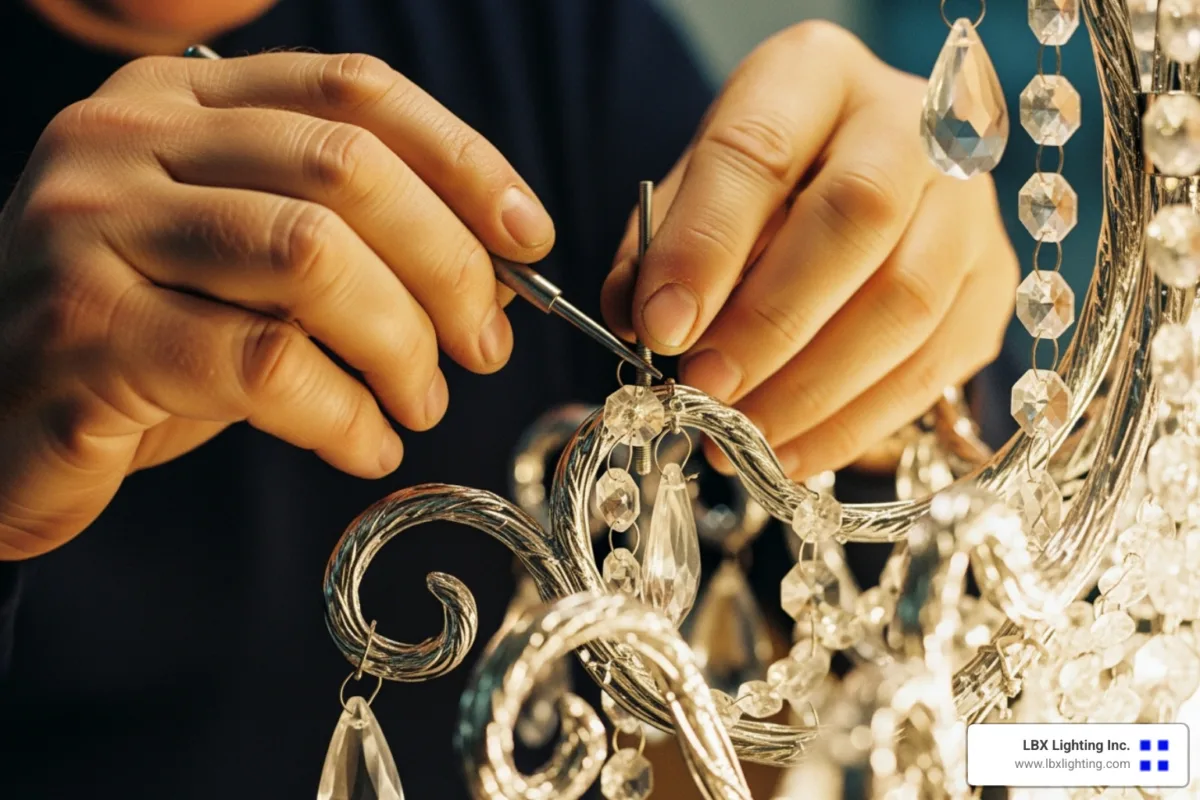
Replacing or Repinning Crystal Elements
Missing or broken crystals are among the most common chandelier issues I see at our Houston showroom. Customers often come in wondering if their cherished fixture is beyond saving, but the truth is, most crystal elements can be replaced or repaired with a bit of patience.
First, you’ll need to identify the crystal type by taking detailed measurements and clear photographs. This documentation will be your best friend when sourcing replacements. When looking for matching crystals, you have several options: contact the original manufacturer, visit restoration specialists, or browse reputable online marketplaces that specialize in chandelier parts.
For those truly special antique or discontinued crystals, don’t lose hope! Specialized glass artisans can create custom replicas that match your original pieces beautifully. One of our clients had a 19th-century French chandelier with unique hand-cut crystals – we connected her with an artisan who created perfect matches that even an expert would struggle to distinguish from the originals.
When it comes to pinning your crystals, always opt for brass pins rather than copper for longevity. Copper corrodes more quickly, which can lead to structural issues down the road. And remember to maintain symmetry by replacing crystals in matching pairs on opposite sides – this preserves the chandelier’s balance and visual harmony.
“Material matching including metal composition and crystal type is crucial for cohesive aesthetics,” as one of our restoration specialists often reminds clients. This attention to detail makes all the difference, especially for valuable or antique chandeliers where historical accuracy matters.
Adhesive Options & Glass Bonding
Choosing the right adhesive for broken crystal elements can make or break your repair project (pun intended!). For clean breaks in crystal prisms, instant glass glue provides excellent results. If you’re after a nearly invisible repair, UV-curing resin works wonders, though you’ll need a UV light to set it properly.
For structural repairs that need to hold significant weight, two-part epoxy offers strength, but be aware it may yellow slightly over time. In a pinch, cyanoacrylate (superglue) can work for quick fixes, though I wouldn’t recommend it for pieces that need to bear weight.
When repairing broken crystal arms, create a custom cradle from craft foam to hold the pieces perfectly aligned while the adhesive cures. A little pro tip from our workshop: “Push foam support back approximately ½ inch before gluing to ensure proper glue flow and fit.” This simple technique helps create those nearly invisible seams we all aim for.
Allow at least 24 hours before handling repaired pieces and a full 36 hours before reinstalling them in your chandelier. Patience here pays dividends in the quality of your repair.
Reinforcing and Refinishing Metal Components
Metal components present their own unique challenges, but with the right approach, most issues can be addressed successfully. For minor bends in arms or decorative elements, gentle pressure with your hands or soft-jawed pliers usually does the trick. Just be patient and work gradually to avoid creating new problems.
Breaks in pot metal components used to be a repair nightmare, but our team has perfected what we call the “superglue-sand weld” technique. Apply a thin layer of superglue to the break, spray with accelerator, sprinkle very fine sand, and spray accelerator again. Build up these layers until you’ve created a strong bond, then paint to match the surrounding finish. As one of our forum experts notes: “At chandelier height, no one will see the seam, so aesthetics are less critical than structural integrity.”
For loose connections, carefully tighten screws or bolts, being mindful not to over-tighten and strip the threads or crack the surrounding metal. If you’re dealing with corrosion, apply an appropriate metal cleaner followed by a quality corrosion inhibitor to prevent future issues.
Touch-up painting is truly an art form – use small artist brushes and carefully matched metallic paint to blend your repairs into the original finish. Take your time with this step; it’s often the difference between a repair that screams “DIY project” and one that looks professionally done.
For quick metal arm repairs, the Rapid Fix metal arm tip can be a lifesaver, but always follow the manufacturer’s instructions carefully and test on a small area first. We’ve seen some magnificent saves using this product, but also some disasters when applied incorrectly!
In our years at LBX Lighting, we’ve found that taking the time to properly repair metal components not only restores your crystal chandelier’s beauty but also ensures its structural integrity for years to come. After all, these neat fixtures are meant to be enjoyed for generations, not just seasons.
Rewiring & Electrical Safety Essentials
If you’ve noticed flickering lights or have an older chandelier, you might be facing electrical issues. In fact, about 60% of all chandelier repair requests involve electrical problems. Your beautiful fixture might need rewiring if you spot frayed wires, if it’s over 25 years old, or if you’re upgrading to energy-efficient LED bulbs. Even chandeliers that have been in storage for years often need electrical attention before they shine again.

When it comes to electricity, safety isn’t just important—it’s essential. Always use UL-rated wire that meets safety standards. Pay attention to the socket types your chandelier requires, and don’t forget about proper grounding to prevent electrical hazards. Every connection needs strain relief to prevent wires from pulling loose over time, and your work must comply with local code requirements. Before finishing, always perform a continuity test with a multimeter to ensure all connections are secure.
If you’re planning to add a dimmer switch, make sure it’s compatible with your bulb type—especially if you’re using LEDs, which often require specific dimmers to avoid flickering.
Step-by-Step Rewire
Feeling confident about tackling the electrical work yourself? Here’s how to approach it:
Start by creating a detailed wiring diagram of your chandelier’s current configuration. This will be your roadmap when reconnecting everything. Choose UL-rated 18-gauge lamp wire for the job—this is the industry standard for most chandeliers.
When removing old wiring, work methodically and take notes about which wires connect where. Cut your new wires with a bit of extra length—you can always trim them, but you can’t easily add more! Before making connections, remember to strip and tin the wire ends by removing about half an inch of insulation and applying a touch of solder if needed.
“I always slide heat-shrink tubing onto the wires before making connections,” shares Michael from our restoration team at LBX Lighting. “It’s much easier than trying to add it afterward, and it provides that professional finish while protecting the connections.”
After connecting everything to the sockets according to your diagram, use your multimeter to test for continuity. This simple step can save hours of troubleshooting later. If your chandelier has multiple circuits controlled by different switches, clearly label each circuit to avoid confusion. Finally, use small zip ties to secure the wires neatly away from any heat sources.

A word of caution from our professional electricians: “All rewiring and installation must be certified by qualified electricians as required by law.” If you’re feeling uncertain about any aspect of the electrical work—especially with valuable chandeliers or complex wiring—please consult a licensed electrician. Your safety and your chandelier’s longevity are worth it.
Balancing, Reassembly & Final Installation
A properly balanced chandelier isn’t just beautiful—it’s safer too. An unbalanced fixture creates uneven stress on your mounting hardware, which could lead to serious problems down the road.
When reassembling, always start from the center and work your way outward. Add arms and components symmetrically to maintain balance. For chandeliers that still seem uneven, small lead counterweights can be discreetly attached to lighter areas.
“I always keep a small bubble level in my toolkit,” says our senior chandelier technician. “Placing it on the bottom ring of the chandelier gives you an instant read on whether your fixture is hanging level.”
Before finishing, adjust the chain length to ensure your chandelier hangs at the perfect height—typically 30-34 inches above a dining table or 7 feet from the floor in a foyer. Secure the canopy tightly against the ceiling, making sure all mounting hardware is properly tightened.
Install the appropriate bulbs according to the fixture’s specifications, and thoroughly test the operation of all lights and switches before considering the job complete.
Your ceiling mounting point must be able to support your chandelier’s weight. For fixtures over 50 pounds—which many crystal chandeliers are—don’t hesitate to consult a structural engineer or experienced installer. At LBX Lighting, we’ve seen too many DIY disasters where beautiful chandeliers came crashing down because their mounting wasn’t up to the task.
With careful attention to these electrical and installation details, your repaired chandelier will not only look gorgeous but will function safely for many years to come.
Maintenance, Documentation & When to Call a Pro
Regular maintenance extends the life of your chandelier and reduces the need for major repairs. According to industry data, proper maintenance can cut the need for major repairs by up to 50%. Think of it as preventative care for your sparkling investment.

Creating a Chandelier Maintenance Schedule
The beauty of your chandelier depends on how well you care for it between repairs. I’ve found that clients who follow a simple maintenance routine enjoy their chandeliers for decades without major issues.
Monthly attention makes all the difference. Take a few minutes to dust with a soft microfiber cloth or feather duster—this prevents grime buildup that can dull crystal brilliance. While you’re at it, do a quick visual check for any loose crystals or components that might need attention before they become bigger problems. Also, scan for flickering bulbs, which can indicate electrical issues worth addressing early.
Every six months, deepen your inspection. Take a closer look at wiring and connections, especially around sockets where heat can cause deterioration over time. Check that mounting hardware remains tight—vibrations from doors closing or even HVAC systems can gradually loosen these components. I also recommend wiping metal surfaces with a slightly damp cloth to remove any buildup that dusting might miss.
Your annual deep clean is when the magic happens. This is your chance to restore that showroom sparkle. Take the time to properly clean all crystal elements (following our earlier cleaning guidance), systematically inspect and tighten mechanical connections, and document any developing issues in your maintenance log.
“Regular dusting and periodic deep cleaning extend the life and shine of restored fixtures,” a conservation expert once told me. “It’s the simplest way to protect your investment.”
For specialized care of premium crystal, our guide on how to clean Swarovski crystal chandeliers provides detailed instructions.
Archiving Your Repair Records
Your chandelier tells a story—and keeping good records helps preserve that narrative while potentially increasing its value. This documentation becomes particularly valuable for insurance purposes or if you ever sell your home.
Create a dedicated digital folder for your chandelier that includes everything in one place. Save all receipts for parts and services—these prove the quality of materials used in repairs and help establish value. Whenever possible, record specific part numbers from manufacturers, which makes future replacements much easier to source.
Before-and-after photos are worth their weight in gold. They document the condition before repairs and showcase the improvements made. These visual records can be especially important for insurance claims or appraisals. Don’t forget to note the specific techniques used during repairs, including adhesives, cleaning solutions, and methods—this information helps future restorers understand what they’re working with.
As an insurance appraiser once told me, “Documentation is often overlooked but extremely valuable. A well-documented chandelier repair history can increase resale value by 15-20% for significant fixtures.”
When to Call a Professional
While I love empowering homeowners to handle their own repairs, there are times when calling in the experts is the wisest choice.
For valuable antiques worth over $5,000 or with historical significance, professional restoration protects your investment. The same goes for structural issues with the main body or mounting system—these affect safety and require specialized knowledge.
Complex rewiring with multiple circuits or custom controls can quickly become overwhelming for DIYers, and extensive damage (more than 25% of components broken or missing) often requires professional coordination to address properly.
Practical considerations matter too. High ceilings that require specialized equipment to access present obvious safety challenges. Insurance requirements sometimes mandate professional service documentation. And when original crystal elements need reproduction, professional artisans can recreate parts with an accuracy that generic suppliers simply can’t match.
“Professional artisans bring generations of knowledge to difficult restorations,” notes one of our specialists at LBX Lighting. “For heirloom pieces, that expertise is invaluable.”
Here in Houston, our team at LBX Lighting can help assess whether your crystal chandelier repair guide journey should be DIY or professional. Sometimes the best approach is a combination—we can handle the complex electrical work while guiding you through cosmetic repairs you can safely manage yourself.
There’s no shame in asking for help with your beloved chandelier. After all, these beautiful fixtures have often been lighting homes for generations—ensuring they continue to shine brightly is worth doing right.
Frequently Asked Questions about Crystal Chandelier Repair
How can I find matching replacement crystals?
The treasure hunt for matching crystals often feels like searching for a needle in a haystack, but don’t worry—I’ve guided hundreds of customers through this process with surprising success!
First, if you know your chandelier’s manufacturer, that’s your golden ticket. Many companies maintain replacement parts for decades. No luck there? Precise measurements become your best friend. I always tell my Houston customers to measure everything: length, width, thickness, hole size, and even count the facets if possible.
“I thought I’d never find a match for my grandmother’s chandelier until I took clear, close-up photos,” shares Maria, one of our regular customers. “The supplier identified the pattern immediately!”
For truly special pieces, professional matching services can work wonders. These specialists have networks and inventories that most of us can’t access. And don’t overlook vintage dealers—many have boxes of original stock from manufacturers long gone.
Industry data shows that about 40% of crystal chandelier repair guide projects involve finding replacement parts. For cherished fixtures, investing in exact matches preserves both beauty and value. At LBX Lighting, we’ve helped countless Houston homeowners track down even the most obscure crystal styles.
What adhesive works best on lead crystal arms?
When it comes to repairing lead crystal—those heavier, more reflective pieces often found in antique chandeliers—choosing the right adhesive makes all the difference between a visible repair and an invisible one.
UV-curing adhesives have revolutionized crystal repair. When properly applied and cured with a small UV light, they create bonds that virtually disappear. The science behind this is fascinating—these adhesives match the refractive index of the crystal, making the repair nearly invisible.
Avoid standard superglue at all costs! I’ve seen too many beautiful crystals ruined by clouding or stress fractures from inappropriate adhesives. Lead crystal demands special care due to its softer composition.
Always test your adhesive on an inconspicuous area first. One of our restoration specialists, James, recommends: “Apply a tiny drop where it won’t be seen. If it causes any clouding or stress lines, try something else.”
Patience is vital with lead crystal repairs. While modern adhesives might claim 24-hour curing times, I always advise my customers to give lead crystal repairs at least 48-72 hours before handling. This extra time allows for proper bonding without stress on the delicate material.
When should I hire a licensed electrician for my chandelier?
While many crystal chandelier repair guide procedures can be DIY projects, electrical work often requires professional expertise. I’ve seen too many DIY electrical mishaps to recommend cutting corners here!
You should absolutely call in a licensed electrician if you’re converting a non-electric antique to electric lighting. This change requires expertise to preserve the fixture’s integrity while ensuring modern safety standards. Similarly, integrating your chandelier with smart home systems demands professional knowledge of both lighting and technology.
Weight matters tremendously with chandeliers. Anything over 50 pounds creates significant structural demands that affect both the electrical box and wiring approach. As Michael at LBX Lighting often says, “Gravity always wins eventually—make sure your installation is done right the first time.”
If your home has aluminum wiring (common in houses built between 1965-1973), professional installation is non-negotiable. These systems require specialized connectors and techniques to prevent fire hazards.
Unusual mounting situations—like sloped ceilings or extra-high installations—benefit from professional experience. And if you’re adding dimmers or custom controls, an electrician ensures compatibility and proper installation.
Industry statistics reveal that about 60% of all crystal chandelier repair guide requests involve electrical issues. This isn’t surprising—electrical systems age, codes change, and new technology emerges. Your beautiful chandelier deserves safe, reliable power that only proper installation can provide.
At LBX Lighting, we’re happy to help you determine whether your project needs professional electrical work or if you can safely proceed on your own. Safety always comes first with these treasured fixtures that light our homes for generations.
Conclusion
Bringing back the sparkle and majesty of a crystal chandelier is truly a labor of love. Throughout this crystal chandelier repair guide, we’ve walked through the steps that transform a damaged fixture into a stunning centerpiece once again. What I’ve found most rewarding in my years at LBX Lighting is seeing the look on a client’s face when they see their restored chandelier illuminated for the first time—that moment of pure joy makes all the careful work worthwhile.
Each repair you make isn’t just fixing something broken—it’s adding to your chandelier’s unique story. The tiny chip in that crystal drop? It happened during your daughter’s wedding reception. The arm you carefully straightened? It bent when you moved into your dream home. These stories become part of your family’s history, intertwined with the light that has witnessed so many special moments.
By keeping detailed records of your repairs and maintaining a regular cleaning schedule, you’re ensuring this neat piece continues to cast its warm glow for generations to come. Think of it as creating a legacy of light that might someday hang in your grandchild’s home, carrying your stories forward.
Here in Houston, our team at LBX Lighting has had the privilege of helping countless families restore their treasured chandeliers. We understand that these aren’t just fixtures—they’re often family heirlooms that hold tremendous sentimental value. Whether you’ve tackled the repairs yourself using our guide or decided to bring your chandelier to professionals, what matters most is preserving both its beauty and the memories it illuminates.
The journey of restoration is about refinding the chandelier’s original brilliance while honoring its history. There’s something deeply satisfying about standing beneath a restored chandelier, looking up at the dancing light, and knowing you’ve helped preserve a piece of craftsmanship that will continue to bring joy and elegance to your home for years to come.
For more information about our selection of crystal chandeliers, visit our crystal chandeliers page.


