

Lights Out? Not Anymore! A DIY Guide to Fixing Flickering Fixtures
September 16, 2025
Get Lit, Houston: The Ultimate List of Holiday Light Installers
September 18, 2025
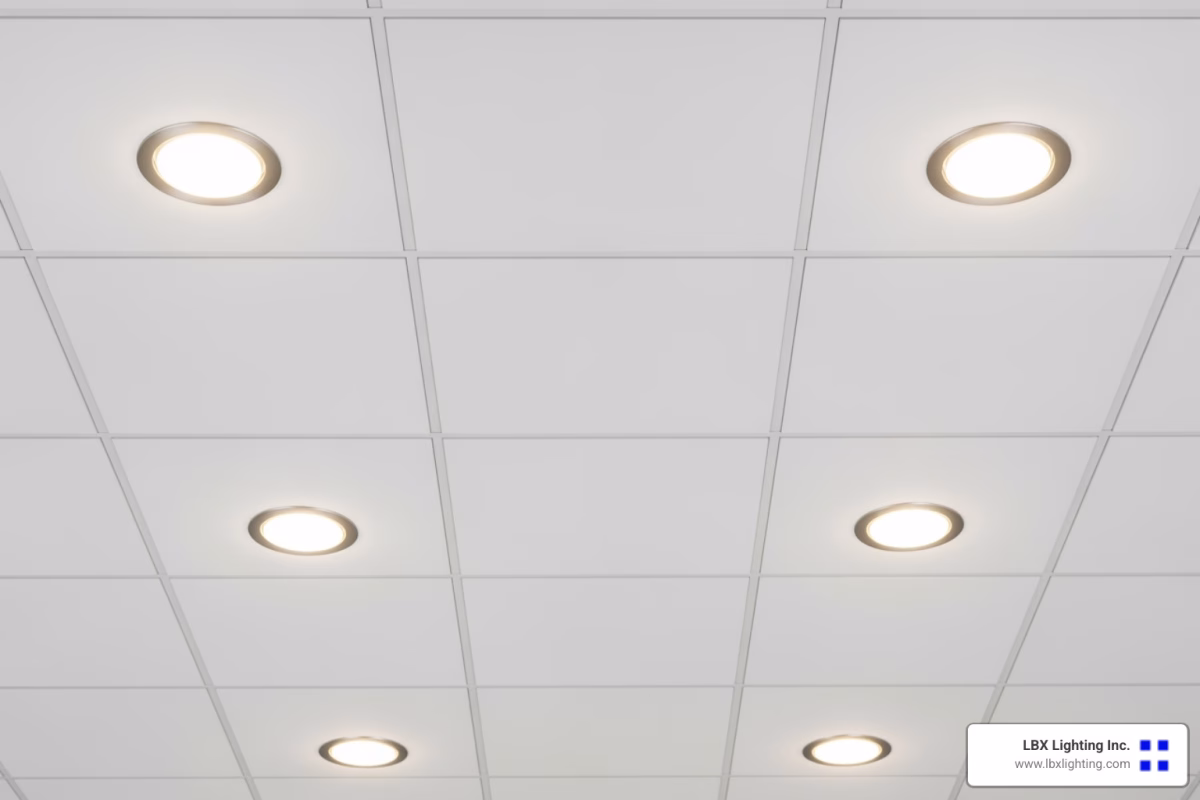
Why Flush Mount Recessed Lighting is Perfect for Modern Homes
Flush mount recessed lighting offers the perfect solution for homeowners who want clean, modern illumination without sacrificing style or ceiling height. Unlike traditional pendant lights or chandeliers that hang down from the ceiling, these fixtures sit directly against the ceiling surface while still providing the sleek, unobtrusive look of recessed lighting.
Quick Installation Overview:
- Best for: Low ceilings, modern aesthetics, easy DIY projects
- Installation time: 2-4 hours for most rooms
- Key benefit: Combines the clean look of recessed lights with simpler installation
- Energy savings: Up to 80% less energy than traditional incandescent fixtures
- Lifespan: 50,000+ hours with LED technology
This lighting style has become incredibly popular because it delivers ambient lighting without the need for extensive ceiling modifications. As one interior designer noted, “flush mount lights are really having their moment right now” – and for good reason. They work perfectly in spaces where traditional recessed lighting might be challenging to install.
Whether you’re updating a bathroom, adding task lighting to your kitchen, or creating layered lighting in your living room, flush mount recessed fixtures give you professional results with a straightforward DIY installation process.
I’m Michael Eftekhar, and for over 30 years at LBX Lighting, I’ve helped Houston homeowners transform their spaces with quality lighting solutions, including extensive work with flush mount recessed lighting installations. This guide will walk you through everything you need to know to successfully complete your lighting project.

Before You Begin: Planning & Preparation
Think of installing flush mount recessed lighting like preparing for a dinner party – you wouldn’t start cooking without checking your pantry first! The same principle applies here. Taking time to plan properly means the difference between a smooth installation and a frustrating evening spent making multiple trips to the hardware store.

Let’s start with the most important part: safety first! I can’t emphasize this enough – always turn off the power at your main electrical panel before touching any wires. It’s not just about flipping a wall switch; you need to cut power at the breaker. Use a non-contact voltage tester to double-check that the circuit is truly dead. Trust me, electricity doesn’t give second chances.
Gather your safety gear too. Safety glasses protect your eyes from drywall dust, and a dust mask will save your lungs from all that ceiling debris. Your future self will thank you for taking these precautions.
Now, let’s talk tools. Having everything ready before you start makes the job flow smoothly. You’ll need a tape measure and pencil for marking your layout, plus a stud finder to locate ceiling joists (you definitely want to avoid cutting into those!). A drywall saw makes clean cuts, while wire strippers and a screwdriver set handle the electrical connections. Don’t forget wire nuts and electrical tape for secure connections.
Layout planning is where your project really takes shape. This step prevents the dreaded “runway effect” – you know, when lights look like they’re guiding planes for landing instead of creating beautiful ambiance.
Start by measuring your room and sketching out where you want each light. A helpful rule of thumb: divide your ceiling height by two to get ideal spacing. So if you have 8-foot ceilings, space your lights about 4 feet apart. Place them roughly 2 feet from walls to avoid creating harsh shadows.
Use your stud finder to locate ceiling joists and mark them on your sketch. You’ll want to position your lights between joists, not through them. This planning step might seem tedious, but it’s what separates a professional-looking result from a “well, we tried” outcome.
Choosing the Right Flush Mount Recessed Lighting
Here’s where things get interesting. When we talk about flush mount recessed lighting, we’re usually referring to fixtures that create a clean, seamless look with your ceiling. These could be traditional recessed cans with flush trim, or newer ultra-slim LED fixtures designed to mount directly to the ceiling surface.
At LBX Lighting, we’ve seen both approaches work beautifully, and our LED Recessed Lighting Fixtures collection includes options for either installation style.
Remodel versus new construction housing matters more than you might think. Since you’re working with an existing ceiling, you’ll want remodel housing. These clever fixtures use clips that grab onto your drywall from behind, eliminating the need to access ceiling joists. New construction housing requires exposed joists, which means major renovation territory.
IC-rated fixtures are non-negotiable if your ceiling has insulation (and most do). The “IC” stands for “Insulation Contact,” meaning these fixtures won’t overheat when surrounded by insulation. Non-IC-rated fixtures need 3 inches of clearance from insulation, which is often impossible in residential ceilings. Save yourself the headache and choose IC-rated from the start.
LED benefits make this choice easy. According to the U.S. Department of Energy’s LED Lighting Facts, LEDs use up to 80% less energy than traditional incandescent bulbs. They also last 50,000+ hours – that’s literally decades of light in most homes. The upfront cost pays for itself through energy savings and reduced replacement needs.
Color temperature affects how your room feels. Warm white (2700K-3000K) creates cozy ambiance perfect for living rooms and bedrooms. Neutral white (3500K-4000K) provides clear, functional light ideal for kitchens and bathrooms. Cool daylight (5000K+) offers crisp, bright illumination better suited for workspaces.
Lumens measure actual brightness – the more lumens, the brighter the light. Consider your room size and purpose when choosing. A kitchen typically needs more lumens than a bedroom for comfortable functionality.
Understanding Trims and Styles
The trim is what you actually see once installation is complete – it’s the “face” of your flush mount recessed lighting. Think of it as the frame around a beautiful painting; it can make or break the overall look.
Baffle trim features ribbed interiors that reduce glare by absorbing excess light. This creates soft, comfortable illumination perfect for living spaces. Reflector trim does the opposite – its shiny interior maximizes light output, making it ideal for task areas like kitchens.
Gimbal or eyeball trim lets you direct light exactly where you want it. The bulb sits in a swiveling mechanism, perfect for highlighting artwork or providing focused task lighting. These work especially well on sloped ceilings since you can aim the light straight down regardless of ceiling angle.
Shower trim includes sealed lenses to protect against moisture – essential for bathrooms and other damp locations. Don’t skip this feature in wet areas; regular trim can fail prematurely in humid conditions.
Modern flush mount recessed lighting accepts minimalist aesthetics. Clean lines, simple shapes, and finishes that blend seamlessly with your ceiling create that coveted “invisible lighting” look. Our Flush Mount Ceiling Lights collection showcases exactly this approach – beautiful illumination without visual clutter.
Choose trim finishes that complement your room’s style. White disappears into most ceilings, while brushed nickel or bronze can add subtle design elements that tie into your other fixtures.
Step-by-Step Flush Mount Recessed Lighting Installation
Alright, here’s where the fun really begins! Installing flush mount recessed lighting in your existing ceiling is one of those projects that makes you feel like a true home improvement hero. We’ll walk through the remodel housing installation, which is what most homeowners need for upgrading their current lighting. If you want a broader overview of the process, our comprehensive guide on How to Install Recessed Canned Lighting in 5 Easy Steps covers all the essentials.
We’re taking this step by step – no rushing! A methodical approach ensures both safety and professional-looking results.

Step 1: Finalize Placement and Cut the Hole
This is the moment of truth – we’re about to make our first cut! But don’t worry, with proper preparation, this step is straightforward and satisfying.
Start by marking the ceiling with your pencil and tape measure. Use those center points from your layout plan as your guide. Double-check your measurements one more time – as they say, measure twice, cut once!
Most remodel recessed lights include a handy paper template that takes the guesswork out of sizing. Tape this template to the ceiling with the center aligned to your pencil mark. This template ensures your hole will be the perfect size for your fixture.
Before you make any cuts, take a moment to check for obstructions one final time. Run your stud finder over the template area to confirm there are no ceiling joists, pipes, or electrical cables hiding behind the drywall. If you’re feeling extra cautious, drill a small pilot hole first – you can easily patch it later if needed.
Now comes the satisfying part: cutting the drywall. Using your drywall saw, carefully cut along the inside edge of the template. Take your time here – a clean, precise cut means your trim will sit perfectly flush against the ceiling later. Think of it like cutting out a perfect cookie – steady hands and patience give you the best results.
Step 2: Run Electrical Wiring
Here’s where things get a bit more technical, but don’t let that intimidate you! If you’re comfortable with basic electrical work, this is totally manageable. If wiring makes you nervous, there’s no shame in calling a licensed electrician – safety first, always.
You’ll need to connect your new fixtures to a power source, typically using 14/2 or 12/2 Romex cable (the gauge depends on your circuit’s amperage requirements). This cable needs to run from an existing power source – maybe a nearby outlet or current light fixture – to each of your new flush mount recessed lighting locations.
The trickiest part is often fishing the cable through your ceiling cavity. You’ll gently guide the Romex cable from your power source to each new opening, leaving about 6 to 12 inches of slack at each fixture location. For longer runs, a fish tape becomes your best friend. Take your time with this step – rushing can damage the cable or your ceiling.
Once your cable is in position, secure it properly to prevent sagging or accidental damage. If you can access ceiling joists or framing, attach the cable there. Make sure it’s not pinched or stressed anywhere along its path.
Finally, you’ll need to connect to your power source following local electrical codes. This means connecting black to black (hot), white to white (neutral), and bare copper to bare copper (ground), always using proper wire nuts for secure connections.
Step 3: Connect and Secure the Fixture
This is where your planning really pays off! Each recessed light fixture comes with its own junction box – a small electrical compartment that’s your connection point.

Start by opening the junction box cover on your fixture. Inside, you’ll find the fixture’s wires waiting to be connected to your Romex cable.
Strip about half an inch to three-quarters of an inch of insulation from your cable’s black, white, and bare copper wires. Clean, precise stripping makes for better connections and a safer installation.
Now for the wire connections – this is actually simpler than it looks! Connect your ground wire (bare copper) from the Romex to the fixture’s ground wire using a wire nut. Next, connect the neutral wires (white to white), and finally the hot wires (black to black). Each connection gets its own wire nut, twisted on firmly.
Tuck all the connected wires neatly back into the junction box and close the cover securely. No loose wires should be hanging out – everything should fit snugly inside.
The final step is securing the housing clips. Gently push your entire fixture up into the ceiling hole. Remodel housings have spring-loaded clips that you simply push up – they’ll spring outward and clamp onto your drywall, holding everything firmly in place. When done correctly, your fixture should sit snugly and evenly with the ceiling surface.
Step 4: Install the Trim and Bulb
We’re in the home stretch now! This final step transforms your electrical work into beautiful, functional lighting.
Installing the trim is usually the easiest part of the whole project. Most trims use torsion springs or tension clips that simply snap into slots inside your recessed housing. Line everything up and push the trim firmly until it sits perfectly flush with your ceiling – that’s the signature look of flush mount recessed lighting.
If your fixture isn’t an integrated LED model, insert your LED bulb now. We always recommend LED for the energy savings and incredible lifespan – you’ll be enjoying these lights for years to come!
The moment you’ve been waiting for: restore power and test your work! Head back to your electrical panel, flip that circuit breaker back on, and then test your new lighting. There’s something deeply satisfying about flipping that switch and seeing your hard work illuminate your space with clean, modern light.
Congratulations – you’ve just successfully installed professional-quality flush mount recessed lighting! Step back and admire how seamlessly your new fixtures blend into the ceiling while providing beautiful, even illumination throughout your room.
Design, Placement, and Common Mistakes
Installing flush mount recessed lighting is just one piece of the puzzle. The true artistry lies in how you design and place them to transform your home’s ambiance and functionality. Think of it like decorating a room – you wouldn’t just throw furniture anywhere and call it done, right? The same thoughtful approach applies to lighting design. We often share Residential Indoor Lighting Tips That Make a Difference with our clients because strategic placement truly lifts a space from ordinary to extraordinary.

Best Practices for Placement
The secret to stunning lighting lies in creating layered lighting. This means combining different types of illumination to achieve balanced, versatile light that works for any mood or activity. It’s like having multiple tools in your toolbox – each one serves a specific purpose.
Ambient lighting forms your foundation. This is your general, overhead illumination that fills the entire room with comfortable light. Flush mount recessed lighting excels at this job, providing even coverage without harsh shadows or glare. In a living room, properly spaced fixtures create that welcoming, “come sit and relax” feeling. In your kitchen, they offer the overall brightness you need to move around safely.
Task lighting is where recessed lights really shine (pun intended!). Position them strategically over kitchen countertops, bathroom vanities, or your home office desk to provide focused illumination exactly where you need it most. A gimbal or eyeball trim lets you direct that light with precision – no more squinting while chopping vegetables or applying makeup.
Accent lighting adds the magic touch. Use recessed lights with adjustable trims to highlight your favorite artwork, architectural features, or that gorgeous stone fireplace. This creates visual depth and turns ordinary walls into gallery-worthy displays.
Different rooms have unique lighting personalities. Living rooms and bedrooms thrive with a combination of ambient flush mount recessed lighting and accent pieces, especially when paired with dimmers to set the perfect mood for movie night or quiet reading. Kitchens demand bright task lighting over work surfaces – your sink, stove, and counters – plus general ambient light for safety and comfort.
Hallways are where flush mount recessed lighting truly saves the day. These narrow spaces with lower ceilings can feel like dark tunnels with poor lighting. Strategic placement creates consistent, unobtrusive illumination that guides movement and prevents that cramped cave feeling.
Bathrooms need bright, even lighting, particularly around the vanity where you’re getting ready each morning. Wet-rated recessed lights are essential for shower areas, while combining them with a decorative flush mount over the main area creates both function and style.
For low ceilings, flush mount recessed lighting becomes your best friend. Unlike pendant lights or chandeliers that hang down and make rooms feel cramped, these fixtures maximize every inch of headroom while creating an illusion of spaciousness.
Don’t be afraid to mix and match! Recessed lights work beautifully alongside other fixtures. Picture flush mount recessed lighting providing ambient illumination in your dining room, paired with a stunning pendant light over the table as your focal point. This combination creates visual interest while serving different lighting needs.
| Feature | Flush Mount Lighting (Surface Fixture) | Recessed Lighting (In-Ceiling) |
|---|---|---|
| Appearance | Sits on ceiling surface; can be decorative; more visible | Installed inside ceiling; only trim visible; minimalist, clean |
| Ceiling Height | Excellent for low ceilings (maximizes headroom) | Ideal for low ceilings (creates open feel) |
| Installation | Generally simpler; one-hole installation for wiring | Requires cutting larger holes; more complex wiring; can be remodel or new construction |
| Light Output | Broad, diffused ambient light | Can be ambient, task, or accent; more directional control |
| Design Variety | Wide range of decorative styles (drum, dome, traditional, modern) | Variety in trim styles (baffle, reflector, gimbal) and finishes |
| Best Use Cases | Bedrooms, hallways, closets, laundry rooms, small kitchens (general light) | Living rooms, kitchens (task/ambient), bathrooms, offices, accent lighting |
Common Mistakes with Flush Mount Recessed Lighting
Even with the best intentions, it’s surprisingly easy to make lighting mistakes that can ruin your beautiful renovation. After three decades in the lighting business, I’ve seen these blunders countless times – but they’re all completely avoidable with a little knowledge.
Poor spacing tops the list of lighting disasters. Too few lights create frustrating dark spots where you’re constantly squinting, while too many fixtures make rooms feel like interrogation chambers. That ceiling height divided by two rule we mentioned earlier? It’s your safety net. Start there, then adjust based on your room’s specific needs.
The dreaded “runway” effect happens when lights march in a perfectly straight, tightly spaced line across your ceiling. This is especially problematic in long hallways or rectangular rooms where it creates that harsh airport terminal look. Instead, consider staggering placement or varying spacing for a more natural, inviting feel.
Ignoring dimmers is like buying a sports car and never shifting out of first gear. Dimmer switches transform your lighting from one-dimensional to infinitely adjustable. Without them, you’re stuck with one brightness setting that might be perfect for cleaning but terrible for relaxing movie nights.
Wrong trim choices can sabotage your entire lighting scheme. Using reflector trim in a bedroom creates unwelcome glare, while baffle trim in a kitchen might leave you cooking in shadows. Match your trim to both function and aesthetics – your eyes will thank you.
Forgetting about layers creates flat, boring illumination. Relying solely on flush mount recessed lighting for everything makes rooms feel one-dimensional. Combine them with table lamps, sconces, or decorative fixtures to add depth and visual interest.
Overlooking room function leads to frustrating lighting that looks good on paper but fails in real life. Your living room needs flexible lighting for reading, entertaining, and relaxing. Your kitchen demands bright, focused light for food prep. Always design with daily activities in mind.
The technical mistakes hurt too. Installing non-IC-rated fixtures against insulation creates serious fire hazards. Always double-check those ratings, especially in insulated ceilings. Similarly, incompatible dimmers can cause LED flickering or damage – modern LEDs need specific dimmer switches designed for their technology.
Great lighting design isn’t about following rigid rules. It’s about understanding how light affects your daily life and creating an environment that supports both function and comfort. Take time to observe how you use each room throughout the day, then design your flush mount recessed lighting accordingly.
Frequently Asked Questions about Lighting Installation
After three decades in the lighting business, I’ve heard just about every question you can imagine! Whether you’re planning your first DIY lighting project or you’re a seasoned home improvement enthusiast, these are the questions that come up most often when folks are considering flush mount recessed lighting for their homes.
What is the main difference between flush mount and recessed lighting?
I love this question because it gets to the heart of what makes each lighting style special! The main difference comes down to where the fixture sits and how much you actually see.
Flush mount lighting sits right on top of your ceiling surface. Think of those classic dome lights, drum shades, or the sleek modern LED disk lights that are becoming so popular. You can see the entire fixture, and it often becomes part of your room’s decor. These are fantastic for providing broad, even light across a room, especially when you have lower ceilings where hanging fixtures would make people duck!
Recessed lighting, on the other hand, is like a lighting magician – it hides inside your ceiling with only the trim (that decorative ring around the bulb) visible. The actual light source is tucked away in the ceiling cavity, creating that clean, minimalist look that’s so popular in modern homes.
Now, when we talk about flush mount recessed lighting, we’re usually referring to one of two things. First, it could be traditional recessed lights where the trim sits perfectly flush with your ceiling – no gaps, no shadows, just seamless integration. Second, it might be those ultra-slim LED fixtures that mount on your ceiling surface but are so low-profile they look like recessed lights without requiring the big ceiling cutout.
Both styles give you that sleek, uncluttered appearance, but the installation and visual impact are quite different. It’s all about what works best for your space and your comfort level with the installation process.
Can I install flush mount recessed lighting on a sloped ceiling?
Absolutely! Sloped ceilings can actually look stunning with the right flush mount recessed lighting approach. The key is choosing fixtures that work with your ceiling angle instead of against it.
Your best friend here is the gimbal trim (sometimes called an eyeball trim). These clever little adjustable inserts let you pivot and direct the light beam straight down, no matter what angle your ceiling is at. Without this adjustment, you’d end up with light shooting sideways across your room – not exactly the cozy atmosphere you’re going for!
When you’re shopping for fixtures, look for ones specifically labeled as “sloped ceiling compatible” or “sloped ceiling rated.” These are designed to handle the angle and still provide proper illumination. Some modern flush mount LED fixtures even come with built-in adjustability, making them perfect for cathedral ceilings, vaulted spaces, or those charming angled ceilings in older homes.
The installation process is essentially the same as on a flat ceiling, but the adjustable trim makes all the difference in getting that light exactly where you need it.
How many recessed lights do I need for a room?
This is probably the most practical question I get, and honestly, it’s one where a little math goes a long way! There’s a simple rule that works great as your starting point: divide your ceiling height by two to get the ideal spacing between lights in feet.
So if you have 8-foot ceilings, space your lights about 4 feet apart. With 10-foot ceilings, aim for roughly 5 feet between fixtures. This formula gives you nice, even coverage without creating those annoying dark spots or the harsh “airport runway” effect.
But here’s where experience really matters – you’ll want to adjust based on what actually happens in that room. A kitchen needs bright, focused light for cooking and food prep, so you might add extra fixtures over work areas or choose higher-lumen bulbs. A bedroom, on the other hand, benefits from softer, more ambient lighting that creates a relaxing atmosphere.
Room size matters too, of course. A 10×12 bedroom might need only four well-placed flush mount recessed lights, while a large living room could require eight or more to avoid dark corners.
Don’t forget about layered lighting either! If you’re planning to use table lamps, floor lamps, or other fixtures alongside your recessed lighting, you can often get away with fewer ceiling fixtures. The goal is creating a comfortable, functional space – not just flooding it with light.
When in doubt, it’s always easier to add more fixtures during the planning stage than to cut new holes later. And remember, dimmer switches are your secret weapon for making any lighting scheme more flexible!
Your Lighting Project, Perfected
What an incredible journey we’ve taken together! From understanding the sleek appeal of flush mount recessed lighting to walking through each installation step, you now have everything you need to transform your home’s illumination. This isn’t just about swapping out old fixtures – you’re creating a modern, energy-efficient lighting system that will serve your family for decades to come.
The change you’re about to create goes far beyond simple aesthetics. Modern lighting design like this can genuinely increase your home’s value, with real estate experts noting that updated lighting is one of the most cost-effective improvements you can make. Potential buyers immediately notice clean, contemporary fixtures that eliminate visual clutter and create that coveted open, airy feeling.
Your new flush mount recessed lighting delivers that modern aesthetic everyone’s talking about. Gone are the days of bulky ceiling fixtures that dominate a room or make low ceilings feel even more cramped. Instead, you’ve chosen lighting that works with your space, not against it. The streamlined look creates a sophisticated atmosphere that feels both current and timeless.
Let’s talk about those energy savings – they’re more significant than many homeowners realize! With LED technology powering your new fixtures, you’ll see up to 80% less energy consumption compared to those old incandescent bulbs. That’s real money back in your pocket every month. Plus, with LED lifespans reaching 50,000+ hours, you’re looking at years of brilliant light with virtually no maintenance. No more ladder climbing to change burnt-out bulbs every few months!
The versatility of your new lighting system is perhaps its greatest strength. Need bright task lighting for meal prep? Your kitchen recessed lights have you covered. Want to create a cozy movie night atmosphere? Dim those same fixtures down low. Looking to highlight that beautiful artwork in your hallway? Adjustable trims let you direct light exactly where it’s needed most.
Here in Houston, I’ve watched countless homeowners light up (literally!) when they see their newly transformed spaces. After over 30 years with LBX Lighting Inc., I can tell you that the right lighting doesn’t just illuminate your home – it transforms how you feel in your space.
We’re genuinely excited to be part of your lighting journey. Our team combines that small-business personal touch with deep expertise and competitive pricing that makes quality lighting accessible to every Houston family. Whether you need guidance selecting the perfect fixtures or have installation questions down the road, we’re here to support your project from start to finish.
Ready to experience the magic of seamless, beautiful illumination? Your home is about to shine in ways you never imagined possible!
Explore our complete Recessed Lighting Solutions


