

Commercial Lighting Companies in Houston: Your Definitive List
September 23, 2025
Light Up Your Life: A Simple Guide to Installing Recessed Ceiling Lights
September 25, 2025
Why Gas Lamp Restoration Brings Historic Charm to Modern Homes
Gas lamp restoration involves cleaning, repairing, and refinishing antique gas lighting fixtures to restore their original beauty and functionality. Whether you’re working with a Victorian chandelier or an outdoor post lantern, the process typically includes disassembly, material identification, cleaning original finishes, replacing worn components, and ensuring safe operation.
Key steps for gas lamp restoration:
- Safety first – Turn off gas supply and inspect all components
- Clean carefully – Preserve original patina with gentle cleaners
- Repair damage – Seal cracks, replace mantles, clean burner tips
- Source parts – Find authentic replacement glass and hardware
- Consider conversion – Upgrade to electric for safety and convenience
Gas lighting was once the third largest industry in the country, behind railroads and mining. These neat fixtures graced homes and streets throughout the 19th century, creating warm, flickering light that electricity couldn’t match. When the tungsten filament light bulb arrived in 1908, gas lamps quickly became relics of the past.
Today, restored gas lamps offer a unique blend of historic authenticity and modern functionality. You can keep them running on gas for that authentic flame, or convert them to electric while maintaining their original appearance. Either way, a properly restored gas lamp becomes a stunning centerpiece that tells a story.
The restoration process requires patience and attention to detail. Original finishes often hide under layers of paint, brass may be mistaken for cheaper spelter, and finding replacement glass can be challenging since many manufacturers closed due to environmental restrictions.
As Michael Eftekhar, I’ve spent over 30 years helping Houston homeowners and designers find the perfect lighting solutions, including gas lamp restoration projects that bring these historic treasures back to life. My experience with antique lighting has shown me that each lamp has its own story and unique restoration challenges.

Understanding Your Antique Gas Lamp
Before diving into gas lamp restoration, you need to understand what type of lamp you’re working with. Each style has its own personality and quirks, and knowing these details will help you restore your piece properly while keeping its historical charm intact.
Gas lamps come in several main varieties. Mantle lamps produce bright, steady light through a delicate fabric mantle that glows when heated. Open-flame lamps create that classic flickering effect we associate with gas lighting. You’ll also find grand chandeliers that once lit entire dining rooms, and neat wall sconces (the Victorians called them “brackets”) that provided ambient lighting in hallways and parlors.
The materials matter just as much as the style. Most quality pieces were made from brass or copper, which develop beautiful patina over time. However, many lamps used spelter – a zinc-based alloy that was much cheaper but often painted to look like brass. Understanding what you’re working with determines everything from cleaning methods to repair techniques.
Don’t forget about those original finishes. That aged patina isn’t just pretty – it’s part of your lamp’s history and value. Sometimes what looks like damage is actually the original finish showing through layers of paint, which can be wonderful news for restoration.
For more insights into the beauty and value of historic lighting pieces, check out More info about Lighting Treasures on our site.
A Glimpse into History and Design
The 19th century was gas lighting’s golden age. Municipal gashouses produced gas from bituminous coal and piped it directly into homes and businesses across nearly every American city. This wasn’t just a convenience – gas lighting became the third largest industry in the country, trailing only railroads and mining.
Gas lamps lit everything from grand chandeliers to charming portable table lamps. The technology was so popular that when electricity started gaining ground, manufacturers created fascinating transitional gas-and-electric fixtures that used both power sources. These combination pieces are particularly interesting finds today.
But change was coming. The tungsten filament bulb arrived in 1908 and quickly changed everything. Electric lighting was simply more convenient and efficient than gas, though it couldn’t match that warm, flickering ambiance that gas provided.
The design styles you’ll encounter reflect their eras beautifully. Art Deco pieces feature clean, geometric lines. Edwardian styles tend toward delicate elegance. Beaux Arts influences bring classical details and proportions. Each style presents unique restoration challenges and opportunities to preserve specific historical elements.
Identifying Lamp Materials
Getting the materials right is crucial for successful gas lamp restoration. Use the wrong cleaning method or repair technique, and you could damage your lamp permanently.
Most quality antique gas lamps were crafted from brass or copper. These metals were chosen for good reason – they’re durable, resist corrosion, and develop that gorgeous patina that makes old lighting so appealing. Brass shows a warm, yellowish-gold color when you scratch beneath the surface, while copper reveals its characteristic reddish tone.
Spelter identification requires a bit more detective work. This zinc-based alloy was the budget option of its day, often painted to mimic more expensive brass or bronze. Here’s the simple test: find a hidden spot and make a tiny scratch. Spelter will show silver or white underneath, while brass reveals that telltale golden color.
Pot metal is another material you might encounter, especially in later pieces. It’s more brittle than brass and sometimes contains iron, making it slightly magnetic. A small magnet can help you identify it – if the magnet sticks, you’re probably dealing with pot metal rather than solid brass or copper.
Don’t overlook the condition of existing finishes. Sometimes a lamp that looks completely painted over is actually easier to restore because that paint protected the original finish underneath. Other times, checking for cracks in spelter pieces is essential, as this material can become brittle with age.
Assessing original paint versus later additions takes practice, but it’s worth the effort. Original decorative finishes on spelter pieces can be quite beautiful when properly restored, while layers of house paint usually need complete removal to reveal what’s underneath.
The Complete Guide to Gas Lamp Restoration
Now that we understand the history and materials, let’s roll up our sleeves and dive into the practical steps of gas lamp restoration. This is where the real magic happens – changing a tarnished piece of history into a glowing centerpiece for your home.

The restoration process requires patience, attention to detail, and a healthy respect for safety. While some homeowners enjoy tackling minor cleaning and refinishing tasks themselves, complex repairs involving gas lines or electrical conversions should always be handled by professionals. Our goal throughout this process is to bring these beautiful pieces back to life while honoring their authentic character and craftsmanship.
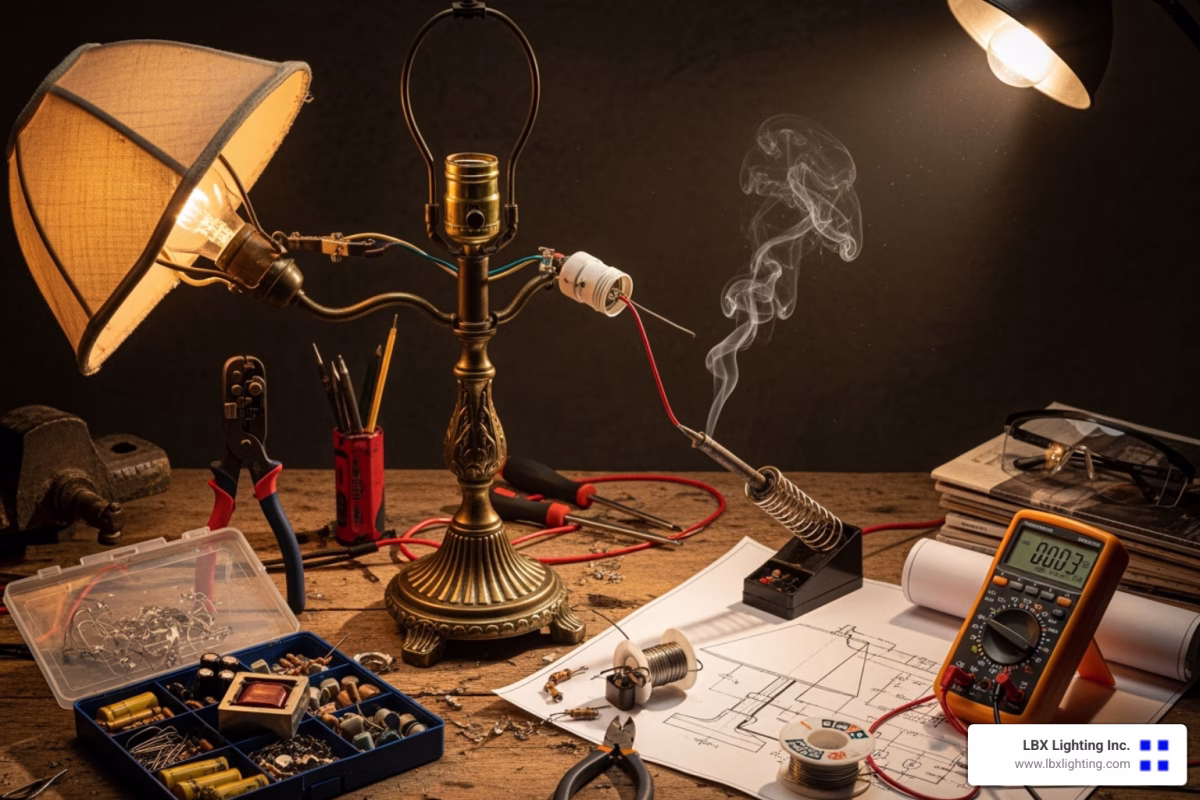
Essential Tools and Materials
Success in gas lamp restoration starts with having the right tools and materials at your fingertips. Think of this as assembling your restoration toolkit – each item serves a specific purpose in bringing your lamp back to its former glory.
For cleaning, you’ll want all-purpose cleaner that’s gentle enough to preserve original patina, along with denatured alcohol for those stubborn spots that need extra attention. Keep plenty of soft cloths and cotton swabs handy for delicate work, and don’t forget felt pipe cleaners or even dental floss – they’re surprisingly effective for cleaning intricate burner tips.
When it comes to repairs, fuel tank sealant products like Red Cote or POR-15 work wonders for stress cracks and leaks in brass fonts, though keep in mind these create permanent fixes. For smaller issues, J-B KwikWeld epoxy sets quickly and handles pinholes beautifully. If you prefer reversible, museum-quality repairs, clear shellac is excellent for fine cracks and seams.
Your basic hand tools should include adjustable wrenches, screwdrivers of various sizes (especially flathead for working with valves), and pliers including needle-nose varieties. If you’re dealing with any electrical components, wire cutters and strippers become essential. A small hammer, flashlight, and good work gloves round out the basics.
Safety gear isn’t optional – it’s essential. Work gloves protect your hands during disassembly, while disposable nitrile gloves keep chemicals off your skin. Safety goggles and a respirator mask are crucial when working with fumes or dust.
Step 1: Safe Disassembly and Inspection
Safety absolutely comes first, especially when dealing with gas appliances. Before touching anything, ensure the gas supply to the lamp is completely shut off. For outdoor lamps, look for a specific shut-off valve near the fixture or at the main gas line. If you’re uncertain about gas connections, don’t guess – consult a professional.
Once you’ve confirmed the gas is off, start with thorough documentation. Grab your camera and take photos from every angle before removing a single screw. These pictures become your roadmap for reassembly, and trust me, you’ll thank yourself later when you’re trying to remember which piece goes where.
Begin disassembly gently, starting with outer housing and glass panels before moving to the burner assembly. Years of grime or rust can make parts stubborn, but resist the urge to force anything. A little penetrating oil and patience work much better than brute force.
As you work, inspect each component carefully for damage. Look for stress cracks in brass fonts – they’re surprisingly common in older lamps. Check for corrosion, especially rust on steel posts or pitting on brass and copper surfaces. Pay special attention to what restoration experts call “electrocuted lamps” – pieces originally designed for oil or kerosene that were later converted to electric. If the center draft tube looks cut down or ragged, it indicates a prior conversion that can make restoration to original fuel burning both costly and challenging.
Don’t forget to examine wick sleeves and center draft tubes if your lamp has them. Wick sleeves should be clean and allow smooth wick movement, while center draft tubes need to be intact for proper fuel burning function.
Understanding how proper lighting affects our daily lives adds deeper meaning to restoration work. Why Good Lighting Is Important in Your Home and for Your Mood explores how thoughtful illumination impacts both functionality and well-being in our living spaces.
Step 2: Cleaning and Refinishing Finishes
This step reveals where your lamp truly begins its change back to former glory. The key is cleaning effectively without destroying valuable original finishes or that beautiful aged patina that adds so much character.
Preserving original patina should be your top priority. If your gas lamp sports an intact, aged brass or copper finish with gorgeous patina, resist the urge to polish it away. This aged appearance adds both character and historical value that can’t be replicated. Use gentle all-purpose cleaner to remove dirt and grime while leaving that precious patina undisturbed. Complete disassembly helps here – it prevents soapy residue from hiding in crevices.
For stubborn, localized dirt on otherwise good finishes, try wetting a cotton swab with denatured alcohol and gently rubbing the problem areas. This technique lifts grime without affecting the overall finish.
Paint splatter removal requires patience and a delicate touch. Start by carefully scraping away splatters using a plastic scraper or even your fingernail. For more stubborn spots, very fine abrasive pads or chemical strippers can help, but test them on inconspicuous areas first. These methods can damage original finishes, so proceed cautiously. Interestingly, fixtures that have been completely painted over sometimes restore more easily because the paint may have actually protected the original finish underneath.
When original finishes are beyond saving, or when working with spelter pieces needing complete overhauls, faux-finishing techniques become valuable tools. Experienced restorers sometimes use leather dye to achieve authentic, darkened finishes on metal that look true to the lamp’s era. The secret lies in matching the finish to the original period and style of your specific piece.
Safety, Repairs, and Sourcing Parts
The heart of any gas lamp restoration project lies in ensuring its safety and functionality. This means carefully handling gas components and, when necessary, finding the right replacement parts to complete the job.

Safely Handling Gas Lines and Components
When it comes to working with gas lines, I can’t stress this enough: safety comes first, always. Never take shortcuts with gas – if you feel even slightly uncomfortable or unsure about something, pick up the phone and call a qualified professional. It’s just not worth the risk.
Before you touch anything, you need to find and operate the shut-off valves. Most gas lamps have a manual ignition valve right in the collar of the fixture. Grab a flathead tool and give it a quarter-turn to the 3 o’clock position – this closes the gas flow completely. For bigger restoration jobs, you might need to turn off the main gas supply to your entire property.
Here’s something many people don’t realize: proper gas pressure is absolutely crucial for your lamp to burn correctly. Natural gas typically needs about 7″ water column (WC), while liquid propane usually requires 11″ WC. If your flame seems weak or uneven, pressure issues might be the culprit – and that’s definitely a job for the professionals.
During professional restoration work, we often blow out the gas lines to clear any debris that might be restricting gas flow. Think of it like clearing a clogged drain – sometimes years of dust and grime can build up inside those lines.
After any work involving gas connections, you absolutely must test for leaks. Here’s a simple method that works every time: mix up some dish soap and water in a spray bottle. Turn the gas supply back on, then spray your soapy solution on all the connections. See any bubbles forming? That means you’ve got a leak. Turn off the gas immediately and either tighten that connection or replace the faulty part.
I always tell my customers: when to call a professional isn’t really a question – it’s anything beyond simple mantle replacement or basic burner cleaning. Gas leaks can lead to explosions, and that’s not something anyone wants to mess around with. If your lamp won’t light, or if you suspect the gas line itself has issues (like being undersized – it should be at least 3/8 inch in diameter), call in the experts right away.
For detailed guidance on your lighting projects, whether it’s a gas lamp or any other fixture, you can Get help with your project from a community of lighting enthusiasts. We’re always here to help you steer these challenges safely.
Key Steps for a DIY Gas Lamp Restoration
While major gas line work belongs in professional hands, there are plenty of structural and aesthetic repairs you can tackle yourself with the right approach and patience.
Stress cracks are incredibly common in brass fonts – it’s just what happens over decades of heating and cooling cycles. For permanent fixes, fuel tank sealants like ‘Red Cote’ or ‘POR-15’ work wonders when applied to the inside of thoroughly cleaned tanks. If you’re dealing with fine cracks or seams, clear shellac offers a reversible, museum-quality option that stands up beautifully to kerosene.
Those annoying little pinholes in fuel tank bases can be sealed effectively with a thin layer of J-B KwikWeld epoxy. The key is proper prep work – clean out all the debris first, remove any oil residue with acetone, then apply your epoxy carefully.
Replacing mantles is probably the most common repair you’ll encounter. Gas mantle lamps use specialized wicks, and if yours is damaged or torn, replace it right away. I recommend replacing mantles at least once a year anyway – it keeps your lamp burning bright and fuel-efficient.
Cleaning burner tips requires different approaches depending on your lamp type. For mantle burners, turn off the gas, remove the mantle, then gently slide a felt pipe cleaner through each burner tip and the air shutter ring holes to clear away soot and debris. Open-flame gas lamps need their burner tips cleaned at least twice yearly – run dental floss or a fine wire brush through the cooled slot in the brass stem, then polish with a soft cloth.
Don’t forget about bug screens – many gas lamps have these little guardians to prevent insects from crawling in and blocking gas flow or oxygen supply. Keep them clean and debris-free for optimal performance.
If your gas lamp restoration involves a combination gas-electric fixture or a converted lamp, take a close look at the wiring and electrical components. Those old cloth cords often need replacement, and lamp sockets frequently fail from years of heat exposure. Even if you’re re-wiring, those sockets might need to go.
Sourcing Replacement Parts
Finding authentic replacement parts for vintage gas lamps can feel like a treasure hunt – challenging, but incredibly rewarding when you find that perfect piece.
Antique glass presents the biggest challenge in most restoration projects. Here’s why: many major glass manufacturers, including the large European company Vianne Glass, were forced to close their doors in 2005 due to environmental restrictions. This has made specific glass shapes, colors, and tints incredibly scarce and valuable.
So where do you look? Antique lighting dealers are often your best first stop – many specialize in vintage lighting and either stock period-correct parts or know exactly where to find them. Salvage yards can be absolute goldmines if you’re willing to dig around a bit. There’s something magical about finding the exact piece you need buried in a pile of architectural remnants.
Online specialty stores have made the hunt somewhat easier, with several retailers focusing specifically on vintage lamp parts. For those really unique or rare components, you might need to work with skilled metalworkers or foundries who can fabricate custom parts to match your lamp’s original design perfectly.
At LBX Lighting, we’ve helped countless clients steer these challenges over the years. We understand how frustrating it can be when you’re so close to completing a restoration but stuck on one elusive part. You can always Find parts and assistance at LBX Lighting when you hit those inevitable walls – we’re here to help make your restoration dreams a reality.
Modern Upgrades and Ongoing Care
Once your gas lamp restoration is complete, you’ll have a beautiful, functional piece of history. But the journey doesn’t end there! You might want to consider modern upgrades or learn how to troubleshoot common issues for years of enjoyment ahead.

Converting to Electric or Low-Voltage Lighting
Many homeowners choose to convert their antique gas lamps to electric or low-voltage lighting after restoration. There are compelling reasons why this makes sense for modern living.
Safety is often the primary concern. While a properly maintained gas lamp is perfectly safe, some people feel more comfortable eliminating open flames and gas lines from their homes. This peace of mind is especially valuable for indoor fixtures or homes with children.
Convenience is another major factor. Electric lamps don’t require gas line maintenance, annual mantle replacements, or manual ignition. You simply flip a switch! You can even connect them to smart home systems or dimmer switches for complete control.
Sometimes practical issues force the decision. If your lamp has irreparable gas line damage, or you want to place it somewhere without a gas hookup, conversion becomes the obvious solution.
The conversion process preserves your lamp’s historical appearance while adding modern functionality. Low-voltage conversion kits fit discreetly within the existing lamp structure, allowing you to run wiring through the original gas pipes (a technique used in historic NYC buildings). LED bulb replacements have come a long way – some are specifically designed to mimic the flickering effect of a gas flame, giving you the aesthetic without the gas.
The key is maintaining historical accuracy during conversion. This means keeping non-functional gas elements like burner tips in place, even though the light now comes from an electric bulb. Done right, most people can’t tell the difference!
If you’re considering an upgrade to more efficient lighting, we’re passionate about sustainable solutions. Explore Eco-Friendly Lighting Solutions on our site to learn about modern, energy-saving options that still provide beautiful illumination.
Troubleshooting Common Gas Lamp Issues
Even after a thorough gas lamp restoration, occasional issues can arise. Here’s your quick guide to the most common problems and their solutions:
Flickering flames usually indicate wind interference or dirty burner tips. Try adjusting the gas valve to increase flame stability, or clean the burner orifice with a pipe cleaner. Installing wind guards can help outdoor lamps maintain steady flames.
Low light output often comes from clogged orifices or low gas pressure. Clean the burner tip thoroughly with dental floss or a wire brush. If that doesn’t help, you might have a gas pressure issue that requires professional attention.
Frequent blowouts are typically caused by too much wind or improper gas adjustment. Wind guards are your first line of defense for outdoor lamps. For indoor fixtures, check that the gas valve isn’t set too high, which can cause unstable flames that blow out easily.
Mantles breaking frequently usually means vibration or poor quality replacement mantles. Make sure your lamp is securely mounted and not subject to shaking from foot traffic or wind. Invest in quality mantles – cheap ones break more often and cost more in the long run.
If you’re uncomfortable troubleshooting gas-related issues, it’s always better to call a professional. Gas safety isn’t worth taking risks with!
The Cost of Professional Gas Lamp Restoration
Understanding the investment involved in professional gas lamp restoration helps you make informed decisions about your project. Costs vary significantly based on your lamp’s condition, type, and the extent of work needed.
Basic reconditioning services typically start around $325. This includes lamp post cleaning, heat-resistant paint application, mantle replacement, blowing out gas lines for proper flow, and glass cleaning. It’s perfect for lamps in decent condition that just need freshening up.
More extensive restoration with new post replacement runs around $590. This service is necessary when your lamp post is leaning due to corrosion at or below ground level. You get a new 7’9″ steel post installed with concrete, plus all the basic reconditioning work.
Conversion services like switching from mantle to open flame, or converting to low-voltage electric (including transformer and up to 100 feet of wire) have their own pricing structures. Electric conversion is often worth the investment for the convenience and safety it provides.
Several factors affect your final bill. Rare materials or complex lamp designs increase both labor and parts costs. Extensive damage requiring custom glass fabrication or major structural repairs will add significantly to the price. Hard-to-find replacement parts can also impact your budget.
Professional expertise commands fair pricing. Experienced restorers handle specialized work that most people can’t do themselves, and their skills are worth paying for. Always get detailed estimates before starting work, and understand what’s covered if complications arise.
Warranty coverage varies by component and service provider. Quality restoration work should come with reasonable guarantees on the workmanship and major components. This protection gives you confidence in your investment.
At LBX Lighting, we believe gas lamp restoration is more than a service – it’s preserving history while creating beautiful, functional lighting for your home. Whether you choose to maintain authentic gas operation or convert to modern electric, the right approach ensures your lamp continues telling its story for generations to come.
Conclusion
There’s something magical about watching a restored gas lamp come to life for the first time. The warm glow, the gentle flicker, the way it transforms a space – it’s a moment that connects us directly to history. Gas lamp restoration isn’t just about fixing an old fixture; it’s about preserving a piece of our past and bringing its timeless beauty into our modern lives.
Throughout this guide, we’ve walked through every step of the restoration journey together. From identifying whether your lamp is made of precious brass or more common spelter, to safely cleaning original finishes without destroying valuable patina, to troubleshooting flickering flames – each step brings you closer to that magical moment when your lamp shines again.
The aesthetic appeal is undeniable. A beautifully restored gas lamp becomes an instant conversation starter, a focal point that draws admiration from everyone who sees it. But the practical advantages are just as compelling. Whether you choose to maintain the authentic gas operation or convert to efficient electric lighting, you’re investing in a fixture that will serve your family for generations.
Maintaining authenticity is perhaps the most rewarding aspect of this entire process. When you preserve original finishes, source period-correct replacement parts, and respect the lamp’s historical design, you’re not just restoring a light fixture – you’re keeping a story alive. Every scratch, every bit of patina, every carefully cleaned burner tip represents decades or even centuries of history.
The satisfaction of preserving history with your own hands is something special. It’s the pride of knowing you saved something beautiful from being discarded, the joy of learning new skills, and the deep satisfaction of connecting with the craftsmen who originally created these masterpieces.
At LBX Lighting Inc., we understand this passion because we share it. Our expertise extends far beyond modern lighting solutions to include the specialized knowledge needed for gas lamp restoration. We’ve helped countless Houston homeowners breathe new life into their antique fixtures, and we’re always excited to tackle the unique challenges each restoration project brings.
Whether you need help identifying materials, sourcing hard-to-find replacement parts, or handling the more complex aspects of gas line work and electrical conversion, we’re here to guide you through the process. Our commitment to exceptional customer service means you’ll never feel alone in your restoration journey.
Ready to bring your antique gas lamp back to life? For professional lighting repair services in Houston, contact us today. Let’s illuminate your world together, one carefully restored lamp at a time.


