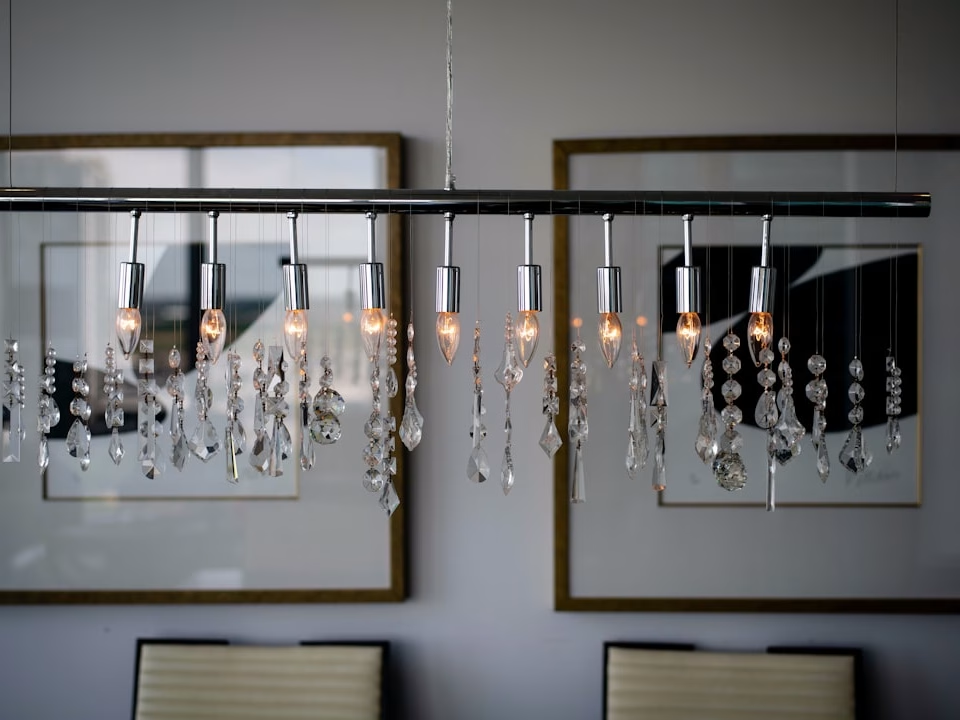
Hang in Style with These Dining Room Pendant Light Fixtures
July 28, 2025
Dining in Style: The Best Lantern Lights for Your Dining Room
July 30, 2025Why Getting Your Dining Room Light Height Right Makes All the Difference
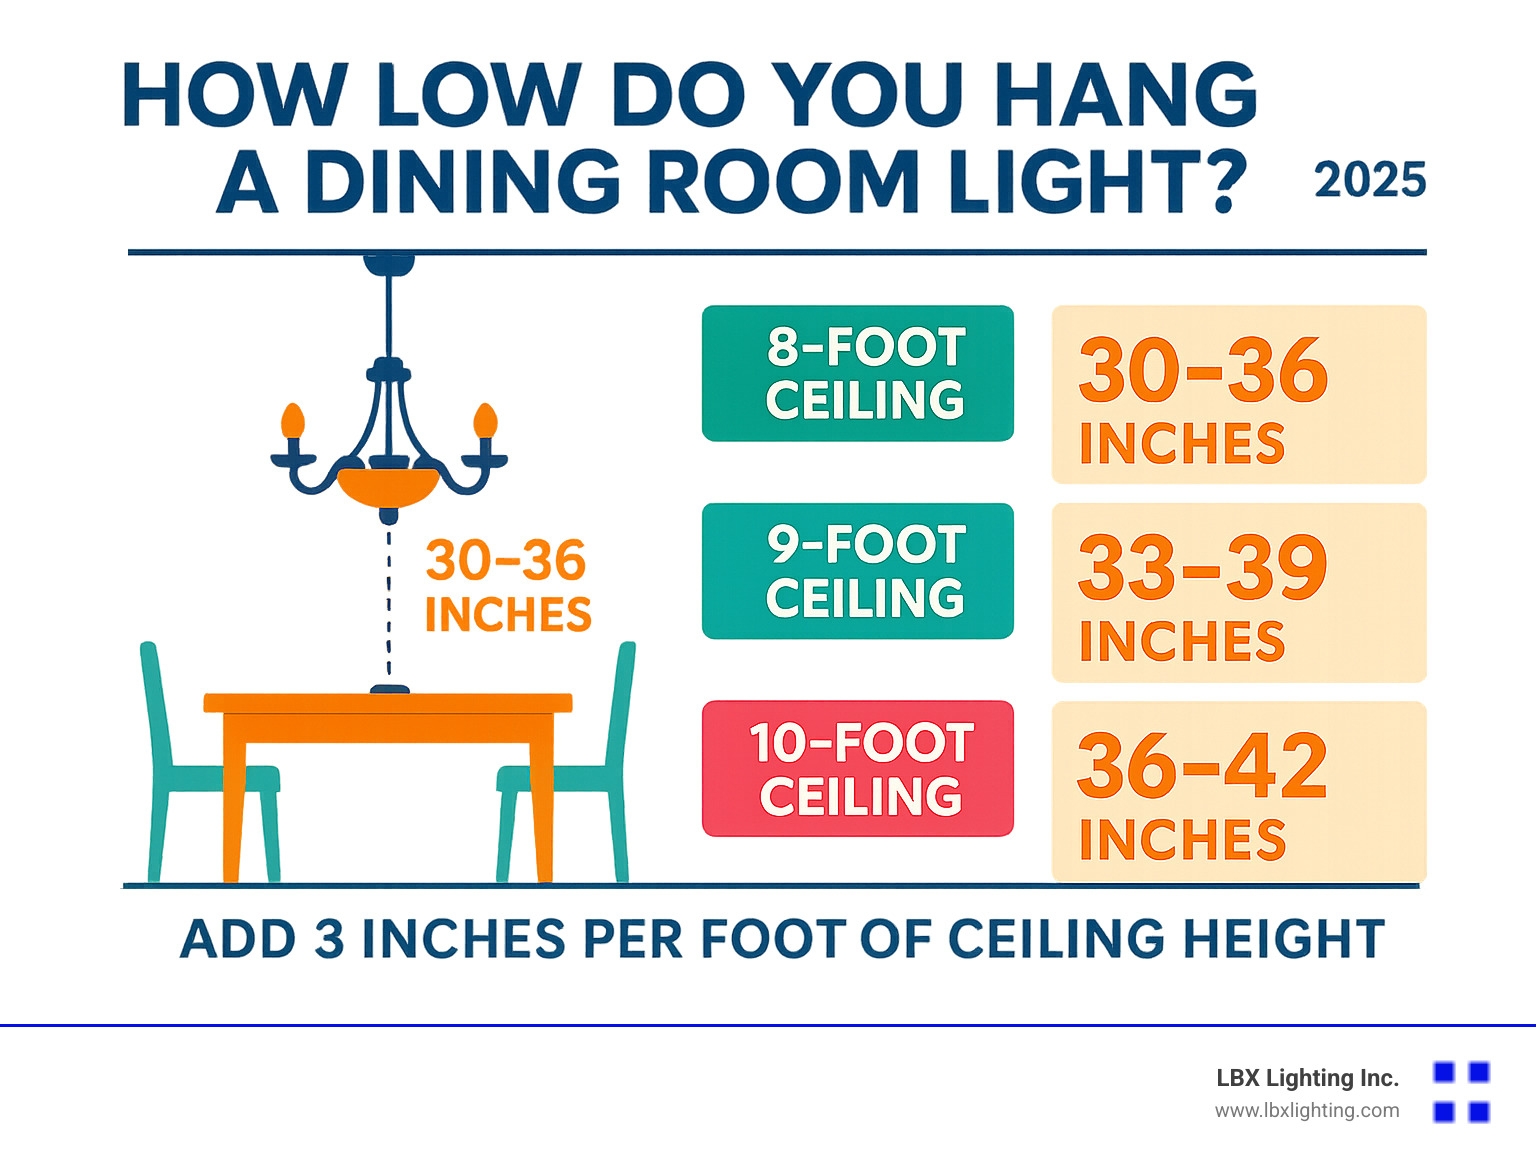
How low do you hang a dining room light is one of the most critical decisions in creating a beautiful dining space. The answer is surprisingly simple:
For standard 8-foot ceilings:
- Hang the bottom of your fixture 30-36 inches above the dining table
- For 9-foot ceilings: 33-39 inches above the table
- For 10-foot ceilings: 36-42 inches above the table
- Add 3 inches for every foot of ceiling height above 8 feet
Getting this measurement wrong is what interior designers call the “#1 most common design mistake” in dining rooms. Too high, and your beautiful chandelier becomes a distant afterthought that fails to create intimacy. Too low, and you’ll have guests ducking under the fixture or staring into blinding bulbs during dinner conversation.
The perfect height transforms your dining room from a simple eating space into a warm, inviting gathering place where the light and table work together as one cohesive focal point.
As Michael Eftekhar, I’ve spent over 30 years helping Houston homeowners and designers solve the exact question of how low do you hang a dining room light through our extensive inventory at LBX Lighting. My experience has shown that getting this one measurement right can completely transform how a dining room feels and functions.
How Low Do You Hang a Dining Room Light? The Golden Rules
When it comes to perfecting your dining room’s ambiance, the hanging height of your light fixture is paramount. It’s not just about illumination; it’s about creating the right mood, ensuring comfort, and establishing visual harmony. We get asked this question on a daily basis, and while there’s no single “right” answer etched in stone, there are definitely easy guidelines to follow that provide an excellent starting point.
The goal is to ensure the light anchors your dining table, provides optimal illumination without glare, and allows for comfortable conversation without obstructing anyone’s view. It’s a delicate balance between functionality and aesthetics, but with a few simple rules, you’ll be well on your way to achieving that perfect glow.
Here’s a quick guide to help you get started, showing the relationship between ceiling height and the recommended hanging height above your dining table. For more insights on various lighting scenarios, check out our Lighting Tips.
| Ceiling Height | Recommended Hanging Height (Bottom of Fixture to Tabletop) |
|---|---|
| 8 feet | 30-36 inches |
| 9 feet | 33-39 inches |
| 10 feet | 36-42 inches |
| 11 feet | 39-45 inches |
| 12 feet | 42-48 inches |
The 30-36 Inch Rule for Standard Ceilings
For most homes, an 8-foot ceiling is the standard. In these cases, the universally accepted rule of thumb is to hang the bottom of your dining room light fixture between 30 and 36 inches above the top of your dining table. This range is considered ideal for several reasons:
- Head Clearance: It provides ample space for people to get in and out of their seats without bumping their heads on the fixture. Nobody wants a “bonk” with their dinner!
- Unobstructed View: When seated, the light fixture should hang just above eye-level, allowing for clear sightlines across the table. This means your guests can enjoy conversation without peering around a dazzling light source.
- Creating Intimacy: Hanging the light within this range helps to define the dining area and create a cozy, intimate atmosphere. It brings the light closer to the table, focusing the illumination where it’s needed most and making the space feel warm and inviting. If it’s too high, the space can feel open, airy, and utilitarian rather than intimate.
- Visual Connection: This height ensures a strong visual connection between the table and the light fixture, making them feel like one cohesive element in the room. If there’s too much airspace between them, the eye disconnects them, breaking the room’s flow.
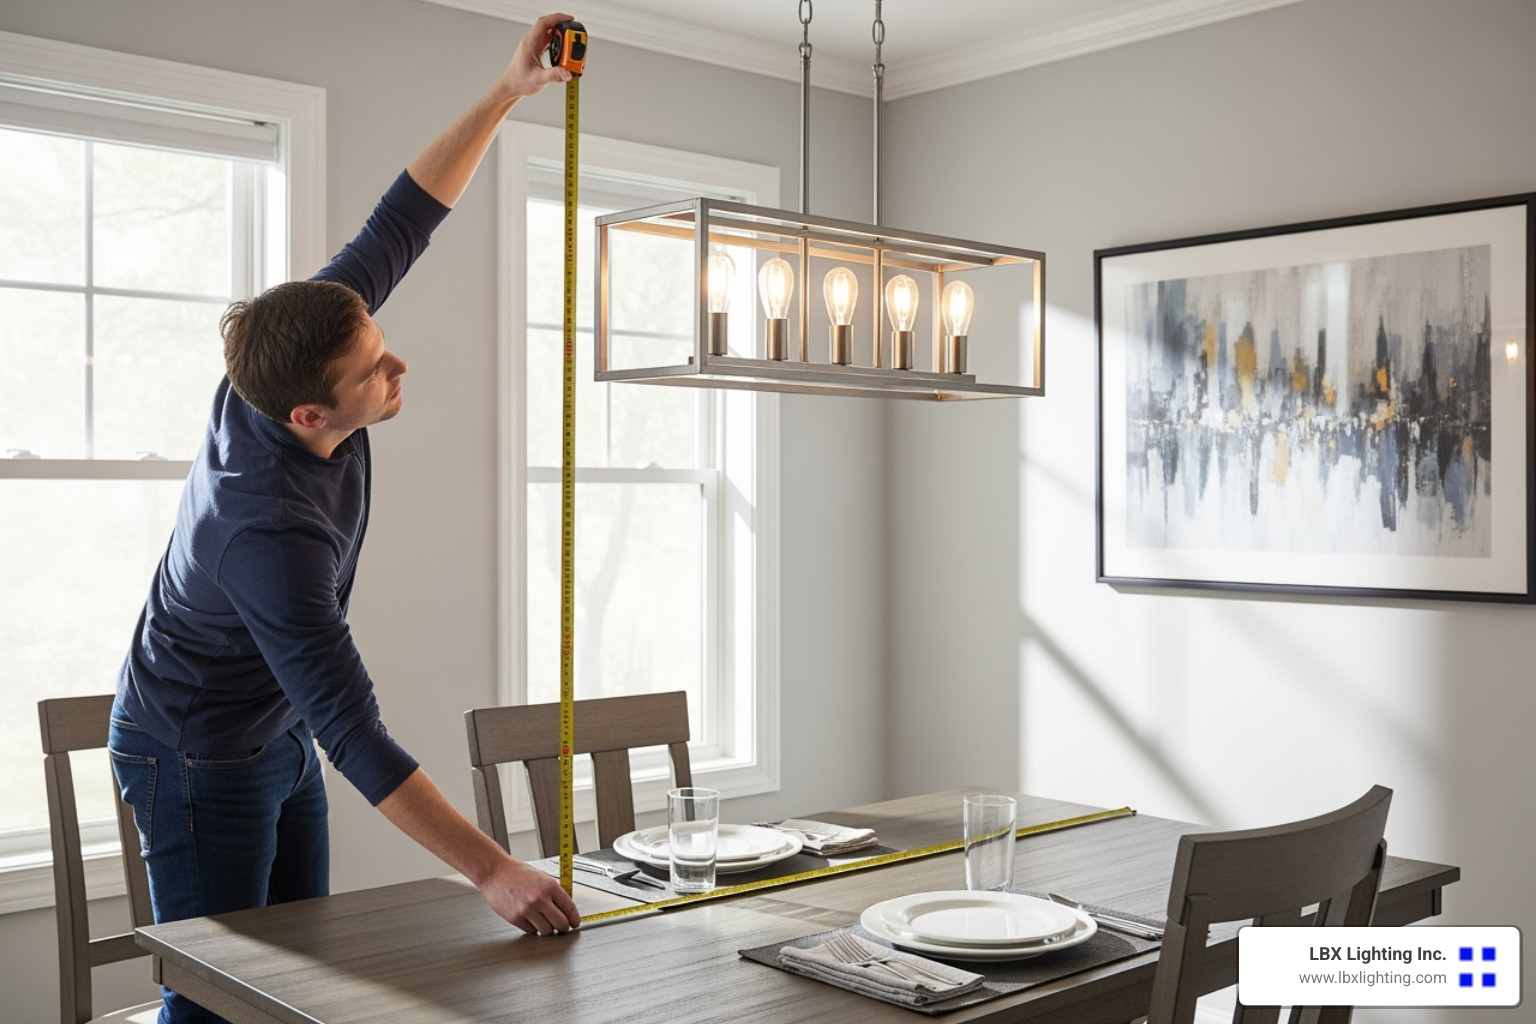
When measuring, always start from the tabletop and measure upwards to the very lowest point of the light fixture. This ensures consistency regardless of the fixture’s design or the height of your dining table itself.
Adjusting for Taller Ceilings
Not all homes are created equal, and many modern residences boast higher ceilings. If your dining room has a ceiling taller than 8 feet, you’ll need to adjust the hanging height of your light fixture to maintain that crucial visual balance and functionality.
The general rule of thumb for higher ceilings is straightforward: for every additional foot of ceiling height beyond 8 feet, add approximately 3 inches to the hanging length of your light fixture. While some sources suggest adding 3-6 inches, we’ve found that 3 inches per foot provides a consistent and aesthetically pleasing result that keeps your fixture in proportion with the room’s scale.
Let’s break it down:
- For 9-foot ceilings: You’d add 3 inches to the standard 8-foot range. This means your light fixture should hang roughly 33-39 inches above the tabletop.
- For 10-foot ceilings: Add another 3 inches (total of 6 inches more than the 8-foot standard). Your fixture would then hang approximately 36-42 inches above the tabletop.
- For 11-foot ceilings: Add 3 more inches (total of 9 inches more). The ideal range would be 39-45 inches above the tabletop.
- For Vaulted Ceilings: These can be a bit trickier, as the ceiling height varies. The key here is to consider the lowest point of the ceiling above the dining area. Apply the same “add 3 inches per foot” rule based on that specific height. For extraordinarily high ceilings (say, 18 feet), some designers suggest hanging the light about 5 feet from the ceiling, ensuring a significant amount of airspace above the fixture to prevent it from feeling dwarfed by the grand scale of the room.
The goal is always to maintain proportion. A fixture hung too low in a room with high ceilings can look disproportionate, while one hung too high will lose its impact and fail to properly illuminate the table. The light needs to balance with the scale of the space and still provide that comfortable, unobstructed experience at the table.
Beyond the Numbers: Matching Your Light to Your Space
While those height measurements give you a solid foundation, how low do you hang a dining room light isn’t just about following a formula. Think of the guidelines as your starting point, not your final destination.
Your fixture’s design personality matters just as much as your ceiling height. A delicate, airy pendant can handle being hung a bit lower than a massive crystal chandelier that commands attention from across the room. The visual weight of your fixture – how heavy or light it appears – should influence your final decision.
Consider your dining table size and your room’s overall scale too. A petite fixture over a large farmhouse table might need to hang slightly lower to maintain visual connection, while a grand chandelier in a compact dining nook might feel overwhelming at the standard height.
Open-concept spaces present their own challenges. You’re not just thinking about how the light looks from the dining chairs – you need to consider the view from your kitchen, living room, and entryway too. The fixture becomes part of a larger visual story.
Personal preference plays a huge role here. Some families love the intimate restaurant feel of a slightly lower fixture, while others prefer the cleaner lines of a higher hang. Trust your instincts – if it feels right and provides good lighting, you’re on the right track.
For inspiration on finding that perfect fixture for your specific space, explore our insights on choosing a modern chandelier.
Sizing Your Chandelier to Your Dining Table
Before you worry about hanging height, let’s make sure your fixture is the right size. Even perfectly hung lighting looks awkward if it’s too big or too small for your table.
The 1/2 to 2/3 rule is your best friend here. Your chandelier’s diameter should measure between half and two-thirds of your table’s width. So if your dining table is 48 inches wide, look for a fixture between 24 and 32 inches across.
There’s also the 12 inches smaller rule – simply choose a chandelier diameter that’s one foot smaller than your table width. It’s an easy calculation that works well for most situations.
Linear fixtures follow different rules. For rectangular tables, your fixture length should be about half to two-thirds as long as your table, and roughly half the table’s width in depth. A 36 by 72-inch table would pair beautifully with a fixture around 18 inches deep by 36-48 inches long.
Round tables love round chandeliers – they create perfect symmetry and balance. Rectangular tables shine with linear chandeliers or multiple pendants that follow the table’s length. Square tables can handle either round fixtures or interesting geometric shapes that echo the table’s clean lines.
The key is proportion. Your fixture should feel like it belongs with your table, not like it accidentally wandered in from another room.
How low do you hang a dining room light based on fixture style?
Your fixture’s design personality absolutely affects how low you hang a dining room light. A massive, ornate crystal chandelier needs different treatment than a sleek modern pendant.
Elaborate chandeliers with lots of visual drama often look best hung slightly higher – maybe an inch or two above the standard range. This gives guests a better view of all those beautiful details without overwhelming the conversation space.
Minimalist pendants with clean lines can usually handle the lower end of the height range. Their simple design won’t dominate the space, even when hung closer to the table.
Drum shades create focused, direct light that can feel intense if hung too low. Consider how the light spreads and whether it might create glare for your diners.
Open-caged designs need special attention if they use exposed bulbs. Nobody wants to stare directly into bright bulbs during dinner, so these fixtures often work better at the higher end of the recommended range.
The visual density of your fixture matters too. A delicate, see-through design can be larger and lower without feeling heavy, while a solid, substantial fixture needs more breathing room.
For examples of fixtures that balance visual impact with practical lighting, check out our lighting tips for inspiration.
A Practical Guide to Installation
Once you’ve determined the ideal height and size for your dining room light, it’s time for installation. While we’re experts in lighting products, we always prioritize your safety.
Step-by-Step: Measuring and Hanging Your Fixture
Installing a chandelier or pendant light can be a rewarding DIY project if you’re comfortable with basic electrical work. However, always remember:
- Safety First: Before touching any wiring, always turn off the power supply to the area at your main circuit breaker. Use a non-contact voltage tester to confirm the power is off.
- DIY vs. Professional: If the chandelier requires complex wiring, if you’re unsure about the process, or if the fixture weighs over 100 pounds (which might require additional ceiling support), we strongly recommend calling a qualified electrician. Your safety is paramount! For more information on home electrical safety, you can consult resources from the Electrical Safety Foundation International.
- Tools Needed: You’ll typically need a ladder, screwdrivers, wire strippers, wire connectors, and a tape measure.
Here’s a general guide for measuring and hanging your fixture:
- Turn Off Power: This step cannot be stressed enough. Locate the correct circuit breaker and flip it to the “off” position.
- Remove Old Fixture (if applicable): Carefully unscrew and disconnect the old light fixture, making sure to note which wires are connected (usually white to white, black to black, and ground to ground).
- Assemble the New Fixture: Often, chandeliers come partially disassembled. Follow the manufacturer’s instructions to put together the fixture before you attempt to hang it.
- Temporary Hanging & Testing the Height: This is a crucial step! Safely and temporarily hang your new fixture above the table. You can use a sturdy temporary hook or have someone hold it. Then, step back and view it from different angles – both standing and, most importantly, seated at the dining table. This allows you to assess the height and visual impact in real-time.
- Pro Tip: If you’re struggling to visualize, try this: hang a balloon from the ceiling with a string, adjusting the string length until the balloon is at your desired fixture height. This visual aid can be incredibly helpful.
- Adjusting Chain or Rod: Most chandeliers and pendants come with adjustable chains or rods. Once you’ve determined the perfect height during your temporary test, adjust the chain length by removing links or cut the rod as necessary. It’s easier to remove links than to add them, so measure twice, cut once!
- Securing the Fixture: Connect the fixture’s mounting bracket to the ceiling box. Thread the fixture’s wires through the chain and canopy, then connect the electrical wires (black to black, white to white, and ground to ground) using wire connectors. Tuck the wires neatly into the ceiling box and secure the canopy to the ceiling.
- Insert Bulbs: Once the fixture is securely mounted and wired, insert the appropriate light bulbs.
- Restore Power: Flip the circuit breaker back on and enjoy your perfectly hung light!
For more detailed guidance on chandelier installation and height considerations, our team at LBX Lighting is always ready to provide expert advice. You can also refer to our article for More on chandelier height.
How low do you hang a dining room light for optimal illumination?
Beyond just aesthetics, the hanging height of your dining room light profoundly impacts its functionality, especially when it comes to illumination. The goal is to provide ample task lighting for dining, create an inviting ambiance, and avoid uncomfortable glare.
- Task Lighting: When hung at the correct height, your dining room light will effectively illuminate the entire table surface, making it easy to see food, read menus, or even play board games after dinner. If it’s too high, the light can dissipate too much, leaving the table in shadow.
- Avoiding Glare: A light hung too low, especially one with exposed bulbs or a very direct light source, can cause uncomfortable glare for those seated at the table. This is where the “just above eye-level” rule becomes critical. The 30-36 inch (adjusted) height typically positions the light to illuminate the table without shining directly into diners’ eyes.
- Bulb Choice: The type of light bulbs you choose also plays a significant role.
- Lumens: This measures the brightness of the light. The right lumen output depends on your room size, the number of bulbs in the fixture, and other light sources in the room. You want enough light to see clearly, but not so much that it feels like an operating room.
- Kelvin (Color Temperature): This measures the “warmth” or “coolness” of the light. For a dining space, warmer Kelvin temperatures (typically around 2700K to 3000K) are highly recommended. These produce a soft, inviting glow that makes food look appealing and creates a cozy atmosphere, perfect for lingering conversations. Cooler temperatures (4000K+) can feel stark and less inviting.
- Using a Dimmer Switch: This is perhaps the most crucial element for optimal dining room illumination. Always, always, always install a dimmer switch for your dining room light. A dimmer allows you to adjust the light intensity to suit any occasion – bright for a family meal, soft and intimate for a romantic dinner, or anywhere in between. It gives you complete control over the ambiance and ensures you can achieve the perfect mood for every gathering. Everyone looks better in dim lighting, and candlelight is often considered the best light for dining!
Frequently Asked Questions about Dining Room Lighting
We get a lot of great questions about dining room lighting, and these are some of the most common ones. Getting these answers right can make all the difference in how your dining space looks and feels!
Should a dining room light be centered over the table or in the room?
This is a fantastic question, and it’s one we hear all the time! The golden rule here is simple: your dining room light should always be centered over where your dining table will be, not necessarily the geometric center of the room itself.
Think of your dining table and its light fixture as a dynamic duo, a single focal point. When they’re perfectly aligned, the space feels anchored, cohesive, and intentional. Even if your table isn’t smack-dab in the middle of the room, centering the light to the table ensures every meal is perfectly illuminated, and the visual flow of your dining area is harmonious. It’s all about creating that perfect partnership between light and table.
Can I hang a chandelier too low?
Yes, you absolutely can! While we often say that hanging a light slightly lower than the standard recommendation can create a wonderfully intimate and cozy feel – almost like a restaurant booth – going too low crosses a line.
A fixture that’s hung excessively low can lead to a few awkward situations: it can obstruct views across the table, making conversation a game of peek-a-boo. It can also create uncomfortable glare directly in diners’ eyes, turning a pleasant meal into a squinting contest. And let’s not forget the literal risk of bumping heads, especially for your taller guests!
It can also make the whole space feel visually “crowded” or heavy. Sticking closely to the 30-36 inch guideline (adjusted for your ceiling height, of course!) is truly the safest and most aesthetically pleasing bet to avoid these common pitfalls. It’s about finding that sweet spot where everyone feels comfortable and the light looks fantastic.
What if I have a very large, open-concept space?
Ah, open-concept living! It’s beautiful, isn’t it? But it does add a layer of consideration when you’re figuring out how low do you hang a dining room light. In these grander spaces, it’s crucial to consider the view from all angles, not just from your dining chairs.
The fundamental 30-36 inch rule (adjusted for ceiling height) still applies to the relationship between your light fixture and your dining table. That part is non-negotiable for comfort and function. However, you also need to ensure the fixture’s scale and its hanging height feel perfectly balanced within the entire open space.
Think about how it interacts with other hanging lights, perhaps over a kitchen island or in a nearby living area. You want a harmonious flow throughout your home, not competing focal points that visually clash. Sometimes, a more elaborate or larger fixture might be just right to fill the vertical space in a grander setting, but its bottom still needs to respect that crucial table clearance.
The best approach? Step back and view your dining light from various vantage points: when you first walk into the room, when you’re seated at the dining table, and even from other living areas. This holistic view is key to achieving optimal placement and ensuring your dining light shines beautifully in your open-concept layout.
Get the Perfect Glow for Your Gatherings
Finding the answer to how low do you hang a dining room light is more than just following a measurement guide—it’s about creating the perfect atmosphere for every meal and gathering in your home. When you get this one detail right, your dining room transforms from a simple eating space into the heart of your home, where conversations flow as smoothly as the warm light overhead.
The beauty of proper lighting placement lies in how effortlessly it works. Your guests won’t consciously notice the fixture height, but they’ll feel the difference. The light creates intimacy without obstruction, illuminates food beautifully, and makes everyone look their best in that flattering, restaurant-quality glow.
Start with the fundamentals: hang your fixture 30-36 inches above your table for standard 8-foot ceilings, then add 3 inches for every additional foot of ceiling height. Size your chandelier to be half to two-thirds the width of your table. These guidelines have stood the test of time because they simply work.
But here’s what we’ve learned after three decades in the lighting business: balance these rules with your personal taste and the unique character of your home. If something feels right when you step back and look at it, trust that instinct. The best-lit dining rooms have that perfect marriage of technical precision and personal style.
The right light truly transforms a room. It can make a small dining nook feel grand or bring warmth to a large, formal space. It’s the difference between a house and a home, between a meal and a memorable gathering.
At LBX Lighting Inc. here in Houston, we’ve helped thousands of homeowners solve this exact puzzle. Our expert staff understands that exceptional customer service means more than just selling you a fixture—it’s about helping you create the perfect ambiance for your family’s story to unfold.
The right dining room light becomes part of your family’s daily rhythm, casting the same warm glow over homework sessions, holiday feasts, and quiet morning coffees. When you find that perfect fixture hung at just the right height, you’ll wonder how you ever lived without it.
For a curated selection of fixtures to perfectly complement your space and help you achieve that ideal glow, explore our extensive range of light fixtures for dining rooms. Let us help you create the perfect backdrop for all your life’s most important moments.


