

Breathing New Life into Old Flames: Gas Lamp Restoration Explained
September 24, 2025
Old Lights, New Life: How to Restore Your Vintage Lamps
September 26, 2025
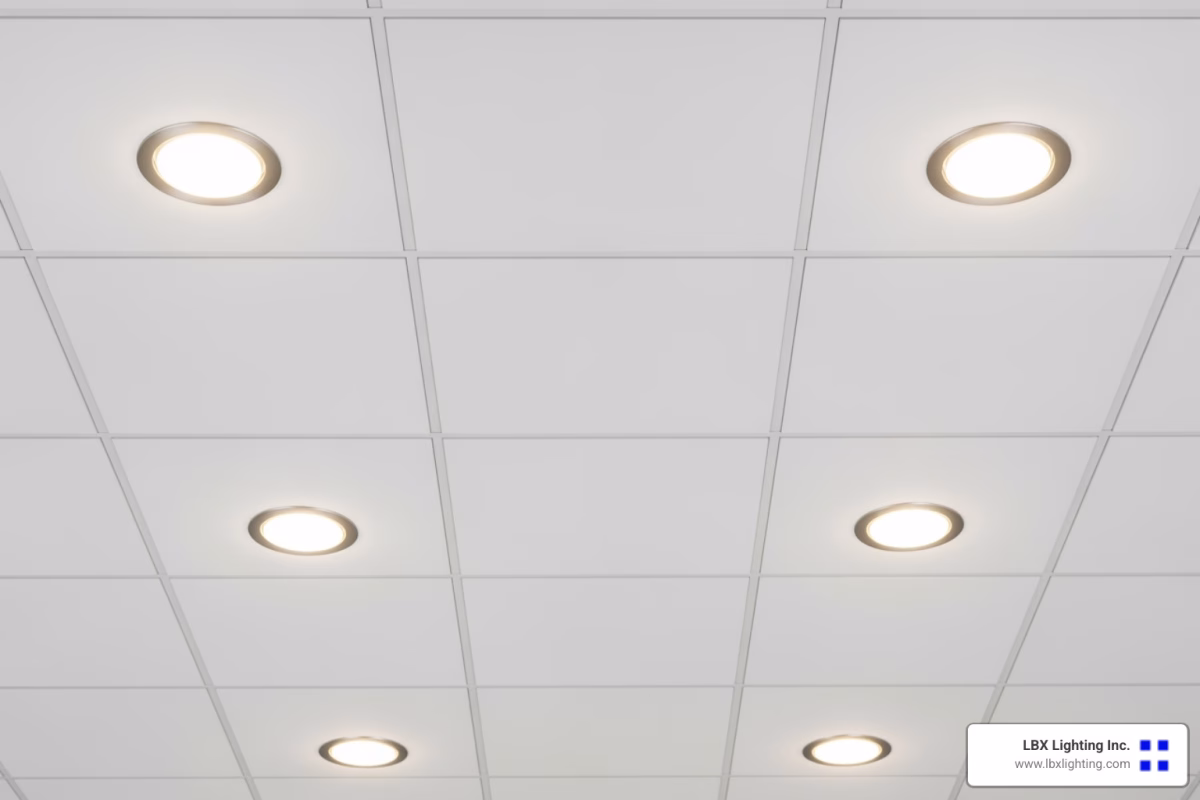
Why Installing LED Recessed Lighting in Your Existing Ceiling Is Easier Than You Think
How to install led recessed lighting in existing ceiling is a project that transforms any space with modern, sleek illumination while staying completely DIY-friendly. Here’s the quick process:
Quick Installation Steps:
- Turn off power at the circuit breaker and test with voltage tester
- Plan layout – space lights 4-6 feet apart, avoid ceiling joists
- Cut holes using hole saw (typically 6-3/8″ for 6″ lights)
- Fish electrical wire through ceiling openings using fish tape
- Wire junction boxes – connect black to black, white to white, ground to ground
- Mount LED wafer lights using spring clips
- Test installation after restoring power
Recessed lights offer a sleek and modern way to illuminate your home without the visual bulk of traditional fixtures. As one expert noted, “LED wafer lights are very affordable. I was able to get a pack of six lights for $60, or a pack of 12 lights for $110.” These thin profile lights fit easily in tight ceiling spaces and provide excellent energy efficiency.
The beauty of modern LED recessed lighting lies in its simplicity. Unlike bulky traditional can lights, today’s LED wafer lights are incredibly thin and can fit under ceiling studs where older fixtures couldn’t. Installing recessed lighting typically takes between 2-4 hours depending on the number of fixtures, making it a perfect weekend project.
I’m Michael Eftekhar, and for over 30 years, I’ve helped Houston homeowners and designers steer lighting installations through LBX Lighting. My experience has shown me that understanding how to install led recessed lighting in existing ceiling properly can save thousands in professional installation costs while achieving professional results. Let’s walk through this step-by-step process that will light up your space beautifully.

Planning Your Recessed Lighting Project
Before we start cutting holes and running wires, proper planning makes all the difference between a smooth installation and a frustrating weekend. Think of this as creating the roadmap for your lighting change – it’s where we’ll map out safety steps, design the perfect layout, and gather everything needed to make your vision shine.

Essential Tools and Materials
Having the right tools ready before starting saves time and prevents those frustrating mid-project trips to the hardware store. I’ve learned this the hard way over thirty years of lighting installations!
Your non-contact voltage tester is absolutely essential for safety – this little device will be your best friend throughout the project. A cordless drill gives you the maneuverability you need when working overhead, while a hole saw (typically 6-3/8 inches for 6-inch lights) creates clean, precise openings.
Here’s a pro tip: get a hole saw dust bowl attachment. This simple accessory catches most debris and makes cleanup much easier. You’ll also need wire strippers for preparing electrical connections and fish tape for pulling wires through existing ceilings, especially when there’s no attic access.
Don’t forget your safety glasses and dust mask – drywall dust gets everywhere. A stud finder helps locate ceiling joists to avoid them, and a sturdy ladder is non-negotiable. For materials, you’ll need 14/2 NM-B electrical wire and quality LED Recessed Lighting Fixtures – modern LED wafer lights work perfectly for existing ceilings thanks to their slim profile.
Safety First: Critical Electrical Precautions
Electricity deserves our complete respect, and safety is never negotiable. At LBX Lighting, we always say “safety first” because no lighting project is worth risking injury.
Always turn off the power at the circuit breaker or main fuse box before starting. Don’t just flip the light switch – that only controls the fixture, not the entire circuit. Once the breaker is off, verify with your voltage tester by touching it to any wires you plan to work with. If it stays quiet and shows green, you’re good to go. If it beeps or lights up red, the power is still flowing.
Ladder safety is crucial when working overhead. Make sure your ladder sits on a flat, stable surface, and never overreach. Having someone spot you makes the work safer and more enjoyable.
When you’re uncomfortable or unsure about any electrical step, please call a professional electrician. The Electrical Safety Foundation International provides excellent safety guidelines that every DIYer should review.
Step 1: Planning the Layout for LED Recessed Lighting in an Existing Ceiling
Now comes the exciting part – designing your lighting layout! How to install LED recessed lighting in existing ceiling starts with understanding your space and lighting goals.
Begin by measuring your room dimensions and noting the ceiling height. The general spacing rule is 4-6 feet between lights. For a typical 12-by-12-foot room, you’ll usually need four to six lights, depending on your brightness preferences.
Consider your lighting purpose carefully. Are you creating ambient lighting for a cozy living room, or do you need focused task lighting over a kitchen island? This decision influences both spacing and the type of trim you’ll choose.
Sketch your room on paper and mark potential light locations. For perimeter lighting, place lights about 39 inches from the walls. The Recessed lighting placement calculator can help determine optimal placement, though remember that different calculators may suggest varying numbers of lights based on their algorithms.
Before marking anything permanently, locate your ceiling joists using a stud finder. These wooden support beams must be avoided when cutting holes. Mark joist locations with a pencil so you know where not to cut. The beauty of modern LED wafer lights is their thin profile often allows installation even in tight spaces where traditional can lights wouldn’t fit.
The Complete Guide on How to Install LED Recessed Lighting in an Existing Ceiling
With our planning complete and safety measures in place, we’re ready to transform your space! This is where the magic happens – where careful preparation meets hands-on work to create the sleek, modern lighting you’ve been dreaming of.

The beauty of modern LED recessed lighting in existing ceilings is that today’s remodel housings are designed specifically for this challenge. Unlike new construction where you have open ceiling access, we’re working with finished ceilings – but don’t worry, it’s absolutely doable with the right approach.
Step 2: Cutting Holes and Checking for Obstructions
This step requires precision and a healthy dose of confidence. Remember our carpentry saying: measure twice, cut once! But first, we need to make sure we’re not cutting into any surprises hiding above that ceiling.
Start by marking your hole locations with your pencil, using the exact center points you planned earlier. If your LED fixtures came with a paper template (most do), use it to trace the outline. This gives you a perfect guide and helps ensure your holes are exactly the right size.
Before making any major cuts, drill a small pilot hole at each marked center – about 1/4 inch will do. This isn’t just for your hole saw guide; it’s your window into what’s happening above that drywall. Grab a flashlight or use your phone’s camera with flash to peek through each pilot hole. You’re checking for pipes, ducts, or existing electrical wires that might be lurking where you plan to cut.
If you spot any obstructions, simply adjust your light’s position slightly. Better to move it a few inches now than to hit a water pipe later!
Now for the satisfying part – cutting the actual holes. For 6-inch LED lights, you’ll typically need a 6-3/8 inch hole saw. Here’s where that dust bowl attachment becomes your best friend – it catches most of the debris and keeps your room (and your family) much happier with you.
Set your drill to low speed to prevent dangerous kickback, and use a side handle for better control. Cut slowly and steadily, letting the saw do the work. The hole should be snug but not tight – no more than 1/8 inch larger than your light’s housing.
Step 3: Running Electrical Wire for LED Recessed Lighting in an Existing Ceiling
Here’s where things get interesting – and where many DIYers wonder if they’ve bitten off more than they can chew. But with some patience and the right technique, running wire through existing ceilings is totally manageable.
The biggest challenge is working without attic access. When you can’t simply walk above the ceiling and drop wires down, you need to get creative. Think of it like a puzzle – you’re connecting dots through hidden pathways.
Your fish tape becomes your secret weapon here. Start at your power source – usually an existing switch box or outlet. If you’re installing a new switch, cut that opening first. Feed the fish tape from the switch opening up into the wall cavity, then guide it across the ceiling space toward your first recessed light opening.
This part requires patience. The tape might hit obstacles, take wrong turns, or seem to disappear into the ceiling void. Don’t get discouraged – even experienced electricians sometimes need multiple attempts to successfully fish wire through tight spaces.
Drilling through ceiling joists is often necessary when your lights cross these structural beams. If you have floor trusses with open webs, you’re in luck – fishing wire through them is much easier. With solid wood joists and no attic access, you might need to cut a small access strip in the ceiling to reach the drilling points.
I know this sounds intimidating, but here’s the truth: drywall repair is manageable, and it’s often the most straightforward way to get professional results. A small rectangular opening about a foot wide gives you the access you need for precise drilling with a flexible drill bit.
Once wire reaches your first light, you’ll daisy-chain to the remaining fixtures. Run wire from the first light to the second, second to third, and so on. Each connection point becomes a junction where you’ll later connect everything together.
Step 4: Wiring and Connecting Your Lights
Now we’re getting to the heart of the electrical work – making safe, secure connections that will power your new lights for years to come. This is where attention to detail really pays off.

Each LED recessed light comes with its own junction box – a small metal or plastic box that houses all the wire connections. Look for the knockouts on the sides – these are pre-scored circles that pop out easily when pushed with a screwdriver.
After removing a knockout, install a push-in connector to protect your wires from sharp metal edges. These little connectors might seem insignificant, but they prevent wire damage that could cause problems down the road.
Feed your electrical cables through the connector into the junction box, leaving about 16 inches of wire extending from your ceiling hole. This extra length makes the wiring process much easier – you can always trim excess later, but you can’t add length once it’s cut short.
Time for the actual connections, and here’s where electrical work becomes beautifully simple. Strip about 3/4 inch of insulation from each wire end – both from your ceiling cables and from the light’s pigtail wires.
The connections follow electrical color coding: black wires connect to black (these carry the power), white wires connect to white (these are neutral), and bare copper or green wires connect together (these are your safety ground). Twist the wire ends together clockwise, then secure each group with a wire nut, twisting until snug.
Give each connection a gentle tug test – if any wire pulls loose, remake that connection. Loose connections cause flickering, buzzing, and potentially dangerous heating.
Our Recessed Canned Lighting fixtures are designed with clear wiring diagrams and quality pigtails that make these connections straightforward and reliable.
Fold the connected wires carefully into the junction box, ensuring nothing gets pinched or strained. Close the box cover securely – this protects your connections and meets electrical code requirements.
Step 5: Mounting the Fixture and Testing
We’ve reached the exciting finale – installing the actual lights and seeing your hard work illuminate the space! This is where everything comes together.
Secure each junction box using the provided clips or brackets. These typically attach to ceiling joists or existing electrical boxes, creating a solid mounting point for your light. Make sure each box feels firmly attached before proceeding.
Modern LED wafer lights designed for existing ceilings are engineering marvels. As you gently push each fixture into its ceiling hole, spring-loaded clips automatically flip out behind the drywall, grabbing and securing the light in place. It’s satisfying to feel those clips engage with a subtle “click.”
Press the light flush with your ceiling surface, ensuring the trim sits evenly all around. The spring tension should hold everything snugly in place without gaps or unevenness.
Most modern LED recessed lights have integrated LEDs, so there’s no separate bulb to install. If your fixtures do use replaceable bulbs, install them according to the manufacturer’s specifications.
Now for the moment of truth! Return to your electrical panel and flip that circuit breaker back on. Head back to your room with anticipation – flip the light switch and watch your space transform with clean, modern illumination.
If everything lights up perfectly, congratulations! You’ve successfully completed a professional-quality lighting installation. If one or more lights don’t work, don’t panic – we’ll cover troubleshooting common issues in the next section.
The satisfaction of completing your own recessed lighting installation is tremendous. You’ve not only saved significant money compared to professional installation, but you’ve also gained valuable skills and the confidence to tackle future electrical projects.
Advanced Considerations and Troubleshooting
Now that your lights are shining brightly, let’s look at some important considerations for long-term performance and efficiency, along with quick fixes for common hiccups.
IC-Rated Lights and Insulated Ceilings
This is a critical safety point, especially for those of us in Houston where attic insulation is common.
- IC (Insulation Contact) Rating: This rating means a recessed fixture is designed to be in direct contact with insulation without overheating. If you have insulation in your ceiling (which most existing homes do), you must use IC-rated fixtures. Using non-IC-rated lights with insulation can be a fire hazard due to heat buildup.
- Non-IC Clearance: Non-IC-rated fixtures require a minimum clearance from insulation (typically 3 inches). If you use non-IC-rated lights, you’ll need to build a protective barrier or box around them to keep insulation away. We strongly recommend choosing IC-rated LED wafer lights for simplicity and safety when installing in existing ceilings. For more details on these requirements, consult the Installation Clearance Requirement for Recessed Luminaries.
- Energy Efficiency: IC-rated and airtight fixtures also contribute to better energy efficiency by preventing heated or cooled air from escaping into your attic space.
Smart Lighting, Dimmers, and Energy Savings
LED recessed lighting is inherently energy-efficient, but we can take it a step further with smart technology and dimmers.
- Dimmer Switch Compatibility: Most LED recessed lights are dimmable, but they require specific LED-compatible dimmer switches. Using an old dimmer designed for incandescent bulbs can cause flickering or buzzing.
- Smart Home Integration: Many LED recessed lights, especially those from LBX Lighting, can be integrated into your smart home system. This allows you to control them via your smartphone, voice commands, or even set schedules and routines. Imagine walking into a perfectly lit room every morning!
- Color Temperature Adjustment: Some smart LED lights offer adjustable color temperature (measured in Kelvins, K). You can switch from a warm, cozy 2700K for evenings to a bright, crisp 5000K for task lighting.
- Energy Savings: LED lighting itself offers significant energy savings. As the U.S. Department of Energy highlights, “using LED bulbs instead of traditional incandescent or halogen bulbs can significantly reduce electricity usage and replacement costs.” Installing dimmer switches further reduces energy consumption and extends your bulbs’ lifespans. Learn more about the benefits of LED lighting from the Energy Savings: LED Lighting resource.
Troubleshooting Common Issues
Even the best DIYers encounter small bumps in the road. Here are some quick fixes for common recessed lighting problems:
- Flickering Lights:
- Incompatible Dimmer: The most common culprit. Ensure your dimmer switch is rated for LED lights.
- Loose Connections: Power off the circuit, then recheck all wire nut connections in the junction box and at the switch.
- Faulty Bulb/Fixture: If it’s just one light, try swapping the bulb (if replaceable) or the fixture itself.
- Buzzing Sounds: Almost always due to an incompatible dimmer switch. Replace it with a high-quality LED dimmer.
- Lights Not Turning On:
- No Power: Check the circuit breaker.
- Loose Wiring: Recheck all connections, especially at the switch and in the fixture’s junction box.
- Voltage Tester: Use your voltage tester to trace the power flow and pinpoint where it stops.
- Uneven Lighting: This usually points back to planning. Re-evaluate your spacing and consider adding more lights or adjusting beam angles if your fixtures allow.
Frequently Asked Questions about Recessed Lighting Installation
After helping hundreds of Houston homeowners with their lighting projects over the years, I’ve noticed the same questions come up time and again. Let me share the answers that matter most when you’re planning how to install led recessed lighting in existing ceiling.
Do I need a permit to install recessed lighting?
This is honestly one of the smartest questions you can ask, and I wish more DIYers would think about it upfront. The answer isn’t a simple yes or no – it really depends on where you live and what exactly you’re doing.
Local building codes vary significantly. In many areas, especially if you’re adding new circuits or making major changes to existing wiring, you’ll need an electrical permit. The whole point of permits isn’t to make your life difficult – they’re there to ensure your work meets safety standards and won’t cause problems down the road.
Here in Houston and throughout Texas, always check with your local building department before you start cutting holes. They can tell you exactly what’s required for your specific project. Some municipalities are more relaxed about simple fixture replacements, while others want permits for any electrical work.
When should you call a licensed electrician instead? If your project involves complex new wiring, upgrading your electrical panel, or if you’re simply not comfortable working with electricity, hiring a professional is the smart move. Licensed electricians know the local codes inside and out, and they can handle the permit process and inspections for you. While we love empowering DIYers, your safety always comes first.
What is the cost difference between DIY and hiring a professional?
This is where the DIY approach really makes your wallet happy! The numbers are pretty eye-opening when you break them down.
For a DIY installation, your main expense is materials – the LED recessed lights themselves, electrical wire, and maybe a few tools you don’t already own. Remember those LED wafer light packs we mentioned earlier? Six lights for around $60, or twelve for about $110. Even with wire, connectors, and a few tools, you’re typically looking at under $200 for materials on a standard room project.
Professional installation costs run between $240 to $280 per fixture. So if you’re installing six lights, you’re looking at roughly $1,440 to $1,680 just for labor. That’s a significant difference!
The time investment for DIY is pretty reasonable too. Converting a standard ceiling light fixture to recessed lighting can be accomplished in less than a couple of hours by a motivated do-it-yourselfer. Of course, if you’re doing a whole room or learning as you go, plan for a full weekend.
The savings really add up, especially when you consider that how to install led recessed lighting in existing ceiling is a skill you can use throughout your home once you’ve mastered it.
How many recessed lights do I need for my room?
This question gets to the heart of good lighting design, and there’s actually some science behind the answer. It’s not just about throwing up as many lights as possible!
Room size is your starting point. That general rule of thumb about spacing lights 4-6 feet apart isn’t just random – it’s based on how light spreads and overlaps. For a typical 12×12 foot room, four to six lights usually provide excellent coverage without creating harsh shadows or overly bright spots.
Ceiling height makes a big difference in how many lights you’ll need. Higher ceilings require either more powerful lights (higher lumens) or closer spacing to get the same brightness at floor level. If you have 10-foot ceilings instead of the standard 8-foot, you might need one or two additional fixtures.
Think about what you’re using the room for. A kitchen where you’re chopping vegetables needs brighter, more focused task lighting than a bedroom where you want soft, relaxing ambient light. Home offices and workspaces generally benefit from more lights, while living rooms and bedrooms often look better with fewer fixtures providing gentle, even illumination.
Online recessed lighting calculators can give you a great starting point based on your specific room dimensions and desired light levels. Don’t be afraid to use them – they take the guesswork out of the planning process.
Here’s a practical tip from my years of experience: you can always start with fewer lights and add more later if you find the room isn’t bright enough. It’s much easier to add an extra fixture than to remove one you don’t need. Plus, with modern LED technology, you’re getting so much more light per watt that you might be surprised how few fixtures you actually need.
Conclusion
You’ve done it! Learning how to install LED recessed lighting in existing ceiling is one of those projects that makes you step back and admire your handiwork with genuine pride. From sketching out that first layout plan to flipping the switch and watching your space transform with beautiful, even light – you’ve tackled something that seemed daunting and made it look easy.
The change goes beyond just better lighting. Your home now has that clean, modern aesthetic that recessed lights provide. No more bulky fixtures casting awkward shadows or collecting dust. Instead, you’ve created smooth, sophisticated illumination that makes every room feel more spacious and welcoming.
The energy savings from LED technology mean this project keeps paying you back month after month. Plus, you’ve gained valuable electrical skills that’ll serve you well in future home improvement adventures. There’s something deeply satisfying about knowing you wired those lights yourself and did it safely.
Most importantly, you’ve proven that with the right guidance and a bit of patience, even electrical projects are within reach. There might have been a moment when you were fishing wire through the ceiling and wondering what you’d gotten yourself into. But look at you now – you’re practically ready to help your neighbors with their lighting projects!
For your next lighting adventure or when you’re ready to explore even more sophisticated options, the team at Recessed Lighting Solutions from LBX Lighting Inc. is here to help. As your Houston-based lighting partner, we understand that great lighting is about more than just fixtures – it’s about creating the perfect atmosphere for your home and family.
Whether you’re planning another DIY project or ready to explore commercial-grade solutions, we’re here with expert advice, competitive pricing, and the kind of customer service that makes all the difference. After all, good lighting should make life brighter in every way possible.


