Building a Christmas Light Controller: The Engineer’s Guide to Holiday Magic
September 27, 2025
Top Lighting Control Systems: Reviews and Buyer’s Guide
September 29, 2025
Why Drop Ceilings Are Perfect for Recessed Lighting
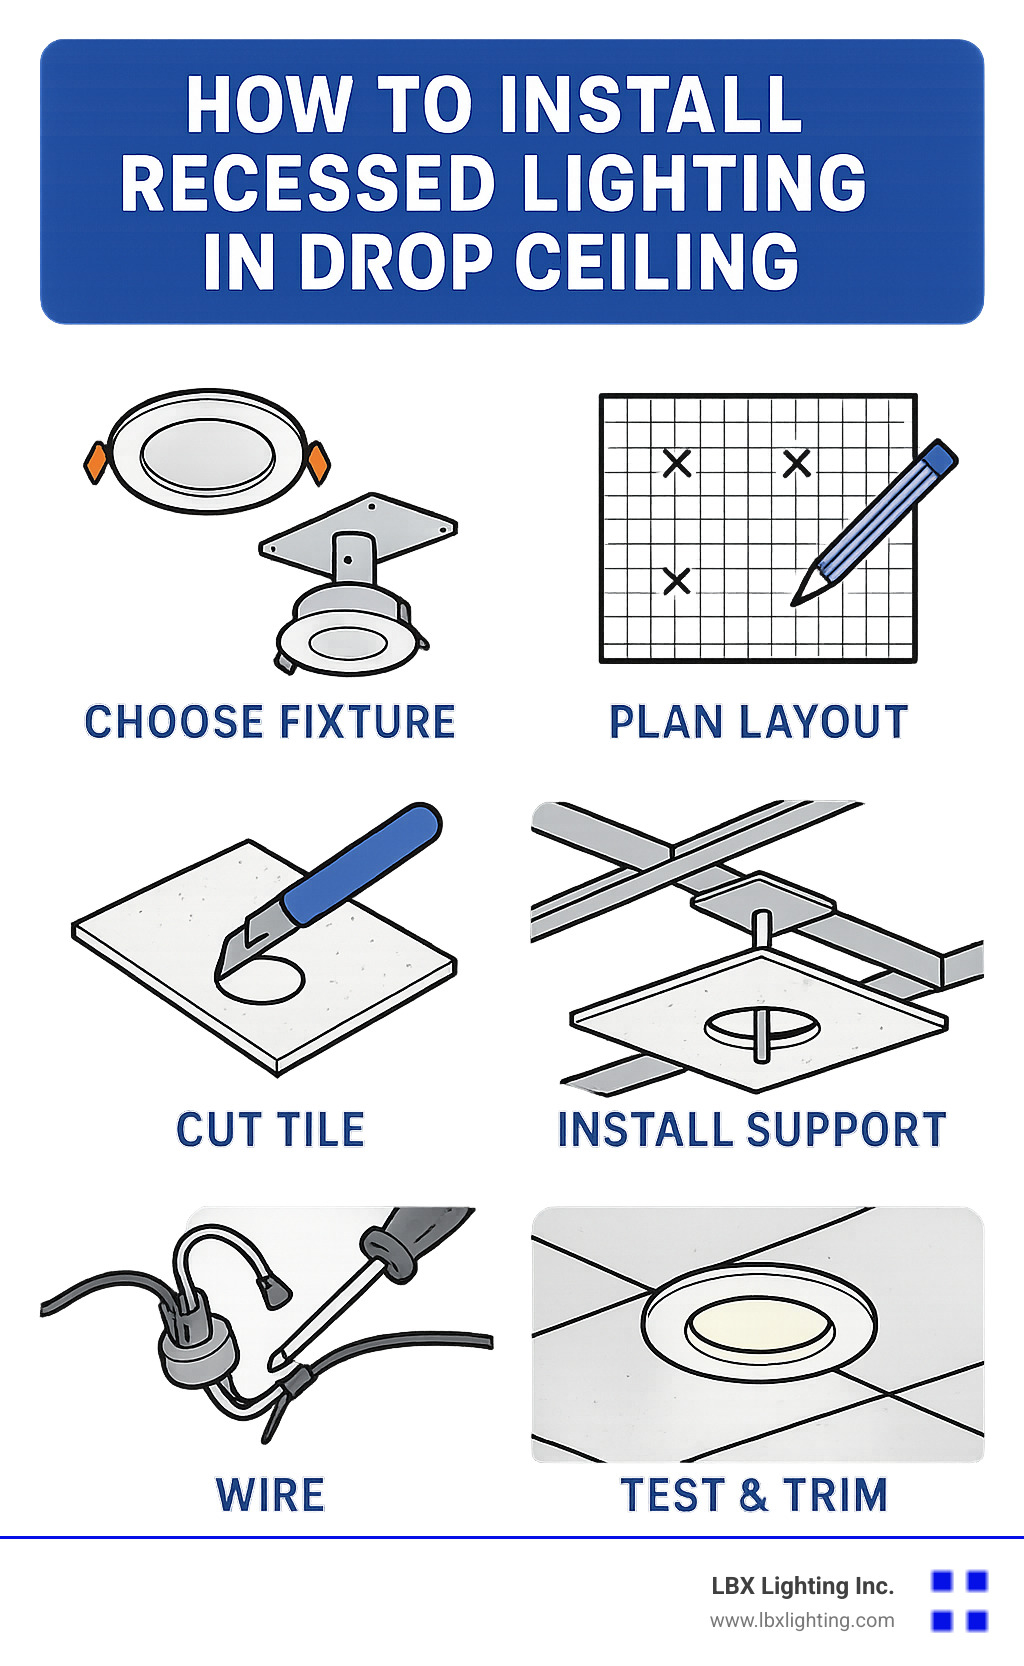
Learning how to install recessed lighting in drop ceiling is one of the smartest upgrades you can make to any basement, office, or commercial space. Here’s the quick answer to get you started:
Essential Steps:
- Choose LED fixtures with T-grid mounting plates or new work housings
- Plan your layout on graph paper for even spacing
- Cut precise holes in ceiling tiles using a utility knife
- Install proper support – tiles can’t hold fixture weight alone
- Wire safely and have an electrician make final connections
- Test and trim for a professional finish
Drop ceilings and recessed lights make the perfect pair. Recessed lighting looks great in any room, and it is an especially good fit for a space with drop ceilings, such as a basement. These lights create a sleek, modern look while saving precious headroom – something traditional fixtures can’t offer.
The beauty of this project lies in its accessibility. Unlike drywall installations that require cutting into finished surfaces, drop ceiling tiles can be removed and replaced easily. You get clean access to the space above while maintaining the flexibility that makes drop ceilings so popular in commercial buildings, theaters, and schools.
LED recessed lights make a great option as they run cooler and often are less complicated to install. This matters especially in drop ceiling applications where heat buildup can damage tiles or create safety concerns.
I’m Michael Eftekhar, and over my 30 years serving Houston’s lighting needs at LBX Lighting, I’ve guided countless clients through how to install recessed lighting in drop ceiling projects that transform their spaces. From basement renovations to commercial upgrades, proper planning and execution make all the difference in achieving that professional look you’re after.
Before You Begin: Planning and Preparation
Before we even think about cutting a single wire or tile, it’s crucial to lay the groundwork. This section covers the essential first steps before you touch a tool, from choosing the right lights to planning their placement for optimal effect. A little planning goes a long way in ensuring a smooth installation and a beautifully lit space.
Choosing the Right Recessed Lights
When it comes to selecting recessed lighting fixtures for your drop ceiling, not all lights are created equal. The best choice will seamlessly integrate with your drop ceiling system and provide efficient, long-lasting illumination. So, what type of recessed lighting fixtures are best suited for drop ceilings?
Our top recommendation, without a doubt, is LED recessed lights. Why? Because they offer a multitude of advantages, especially for drop ceilings. Firstly, LEDs run significantly cooler than traditional light sources, which is a huge benefit in a drop ceiling environment. This minimizes heat buildup, protecting your ceiling tiles and reducing any potential fire hazards. Secondly, LEDs are incredibly energy-efficient, consuming up to 90% less energy than traditional bulbs and boasting impressive lifespans, often exceeding 25,000 hours. This means lower electricity bills and less frequent bulb changes – a win-win!
You’ll typically encounter two main styles: “canned” (or traditional housing) and “canless” LED fixtures.
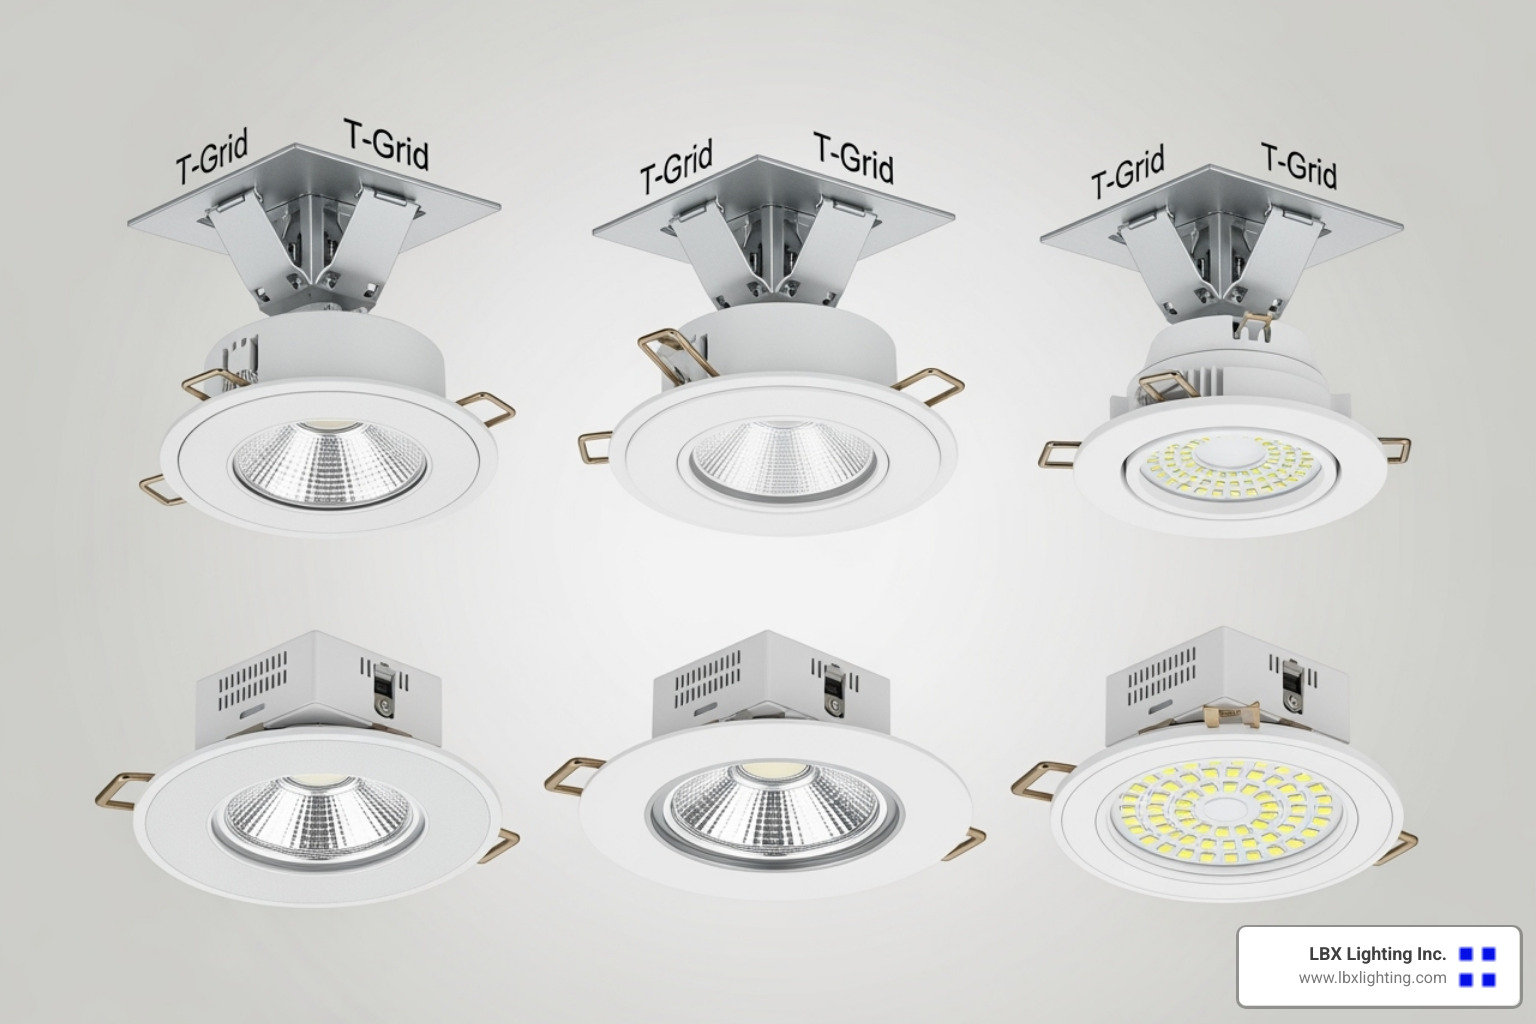
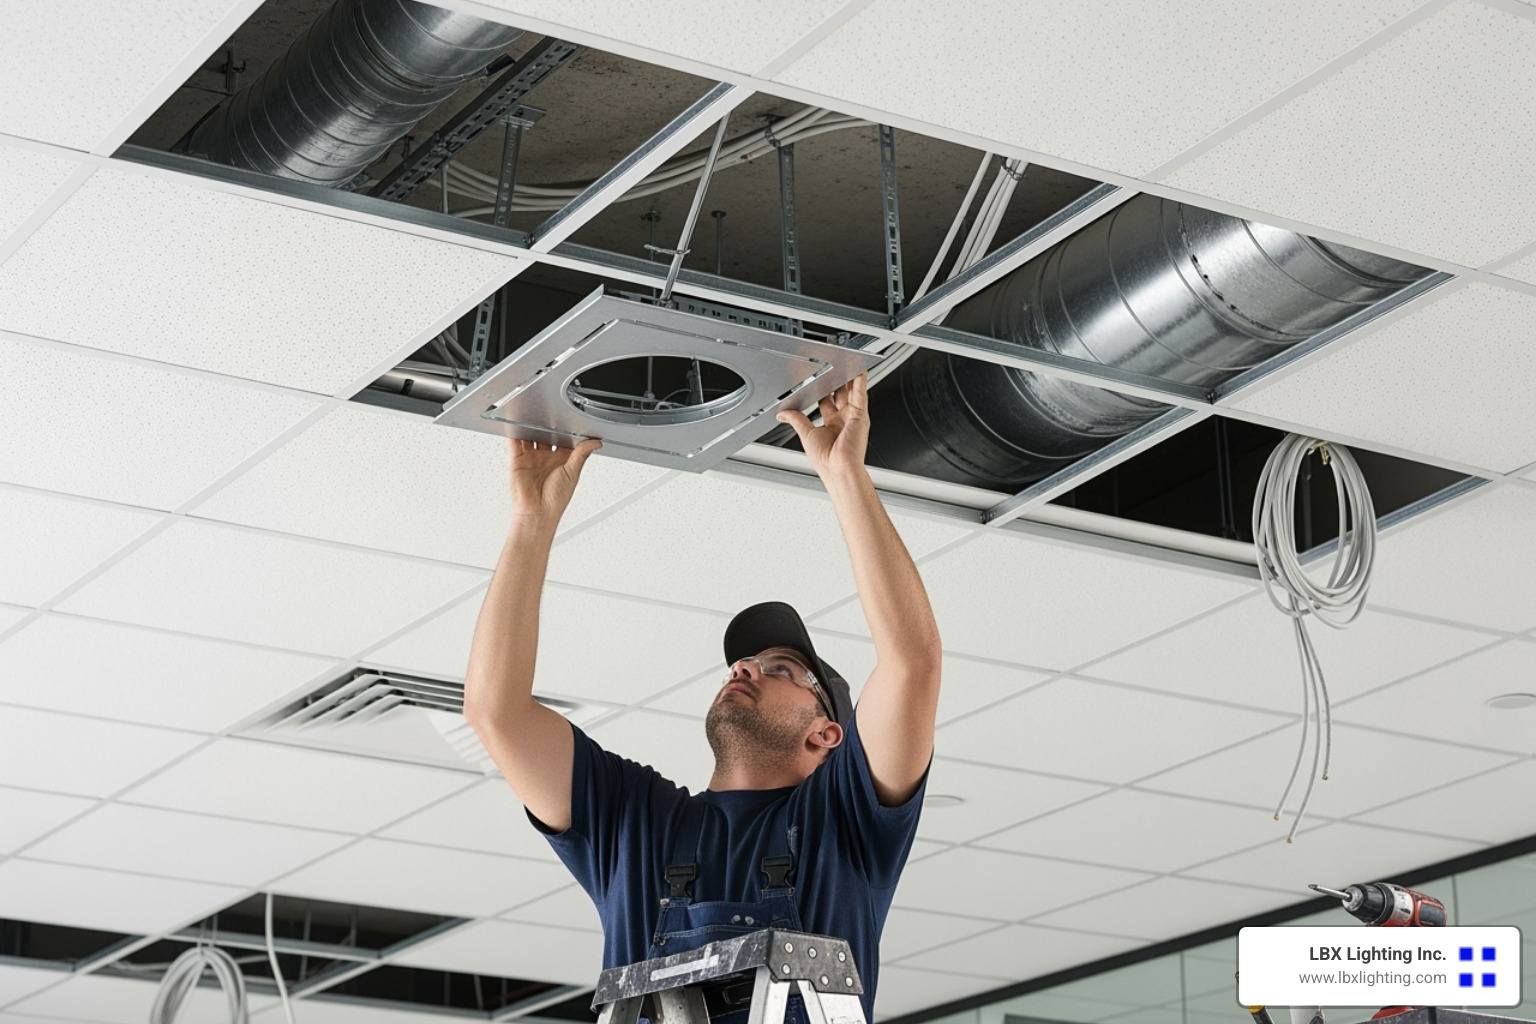
- Canless LED fixtures: These are increasingly popular because they are compact, often thinner, and integrate the light source directly into the trim. For drop ceilings, some canless LED fixtures have separate mounting plates available to purchase separately to help with the installation. These T-grid mounting plates are designed to rest directly on the ceiling grid, ensuring the light is flush with the face of the tile. This makes installation quite straightforward.
- Canned lights (Recessed Cans): If you opt for traditional recessed cans, your best bet for a drop ceiling is to use “new work” housings. These typically come with adjustable mounting arms or legs that have nifty little clips designed to snap directly onto the suspended ceiling T-bar (the metal grid). This provides robust support, ensuring the fixture’s weight is borne by the grid, not the tile itself. While “remodel cans” with small clips that attach directly to the ceiling tile exist, we strongly advise against them for drop ceilings. The weight of the fixture will cause the tile to sag over time, ruining the sleek look you’re going for and potentially violating ceiling manufacturer instructions.
Additionally, consider IC-rated fixtures (Insulated Ceiling rated) if there’s any chance the fixture will come into direct contact with insulation above your drop ceiling. While drop ceilings typically have an air gap, it’s a good practice to ensure your chosen fixtures meet all safety standards, including fire-rated applications. Never use incandescent lights in fire-rated applications, and they can be too hot for plastic-surfaced panels.
For a comprehensive selection of modern, energy-efficient options, explore our LED Recessed Lighting Fixtures. Our expert team in Houston, TX, can help you pick the perfect fixtures for your project.
Tools and Materials You’ll Need
Having the right tools and materials is half the battle. Before you start, gather everything you’ll need to ensure a smooth and safe installation process.
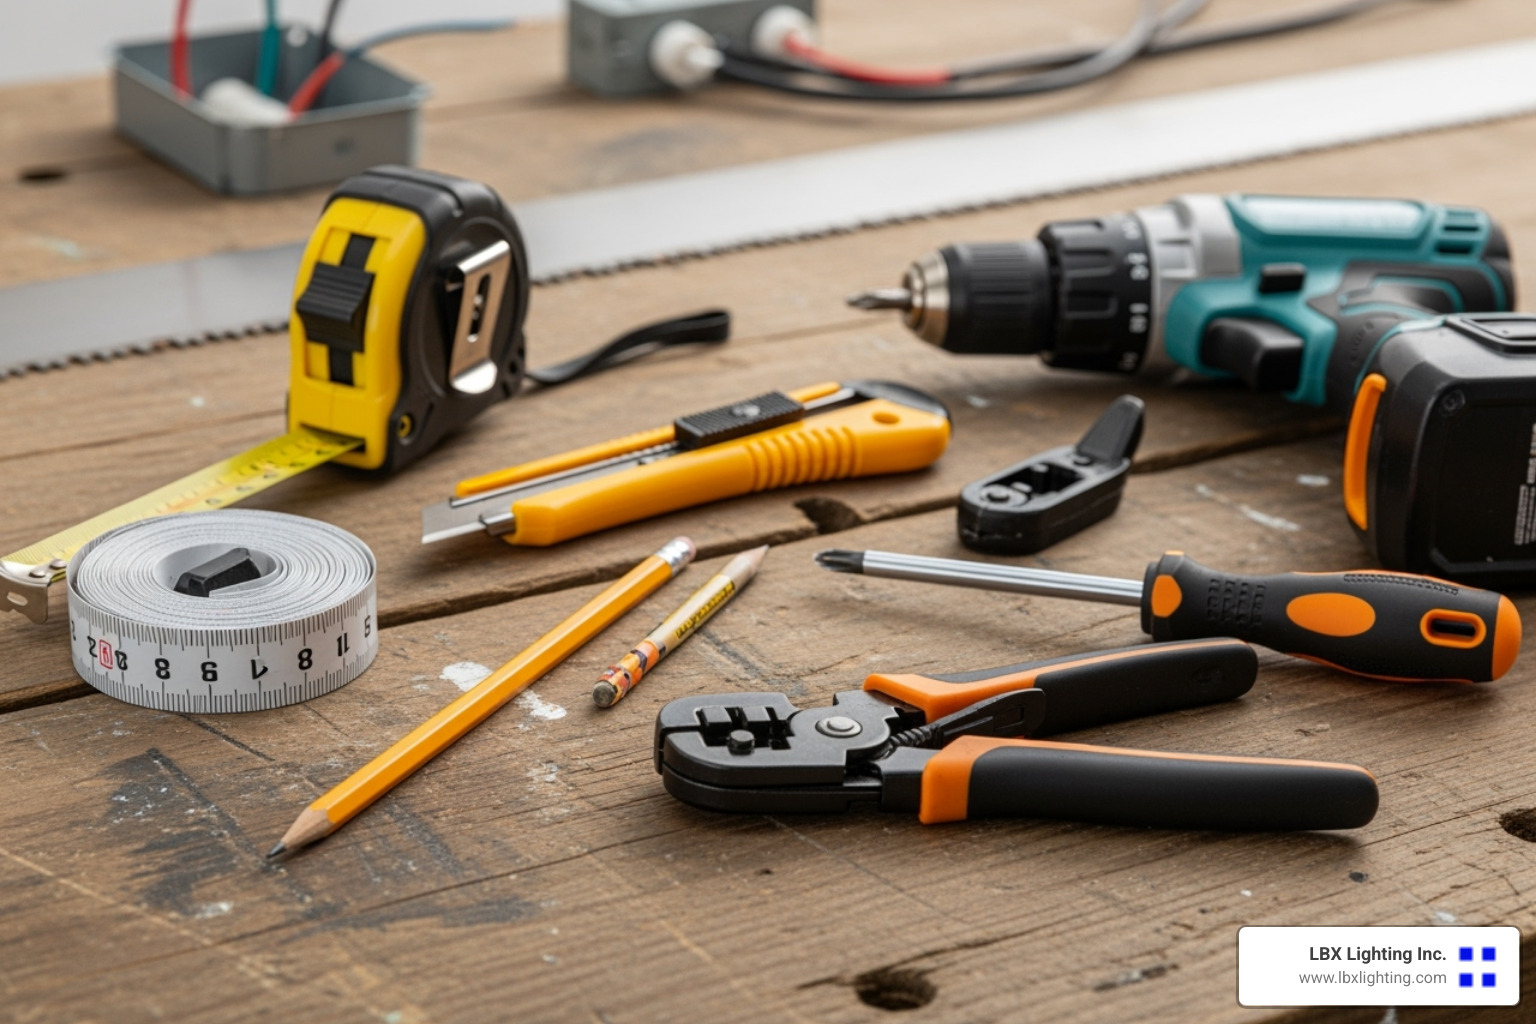
Here’s a comprehensive list:
- Tape measure: For accurate layout and cutting.
- Pencil: For marking positions and cut lines.
- Utility knife or keyhole saw: Essential for cleanly cutting holes in ceiling tiles. A hole saw attached to a drill can also work, but ensure it’s the precise size for your fixture.
- Wire strippers: For safely stripping insulation from electrical wires.
- Voltage tester (non-contact): Absolutely crucial for verifying that power is off before you touch any wires.
- Ladder or step stool: For safe access to the ceiling.
- Safety glasses: To protect your eyes from dust and debris.
- Recessed light fixtures: The specific LED or canned lights you’ve chosen.
- Mounting brackets/support structures: T-grid mounting plates, support bars, or new work housing clips, depending on your chosen fixture type.
- Electrical wire (Romex/NM cable): If you’re running new circuits or extending existing ones.
- Wire connectors (wire nuts): For making secure electrical connections.
- Pliers: For twisting wires and securing connections.
- Goof ring trims (optional): These handy rings can mask imperfections if your cut hole ends up a little too large.
- Chalk line or string: For laying out your grid pattern on the ceiling for even light placement.
Planning Your Layout
The layout of your recessed lights is critical for achieving optimal illumination and a visually appealing result. A well-planned layout can transform a room, while a haphazard one can leave it unevenly lit or visually cluttered.
Start by creating a detailed map of your room. Graph paper works wonders for this, or you can use planning software. Measure your room’s exact dimensions, including ceiling height. This height is key for spacing calculations:
- For general ambient lighting, a common rule of thumb is to space lights roughly the same distance apart as half your ceiling height. So, if your ceiling is 8 feet high, lights might be spaced 4 feet apart.
- Consider the purpose of the lighting. Are you aiming for general illumination, task lighting over a workspace, or accent lighting to highlight a specific feature?
- Mark furniture placement on your plan to avoid lights being directly above large objects that might block light.
- Strive for a symmetrical layout. A single recessed fixture centered in one direction or another usually looks good. Even spacing creates a balanced and harmonious look.
This planning phase also involves identifying your power source and mapping out the electrical wiring path. While we’ll dig into wiring details shortly, having a rough idea of how your wires will run now can save headaches later. We’re not just throwing lights up; we’re crafting an illuminated space!
The Step-by-Step Guide on How to Install Recessed Lighting in a Drop Ceiling
Now that we’ve got our ducks in a row and our tools at the ready, it’s time to dive into the actual installation. Follow these detailed steps for a safe and secure installation that will transform your space from ordinary to extraordinary.
Step 1: Safety First – Power Down
This is hands down the most important step in any electrical project. I can’t stress this enough – skipping this step isn’t just risky, it’s potentially deadly. We’re dealing with electricity here, and it doesn’t give second chances.
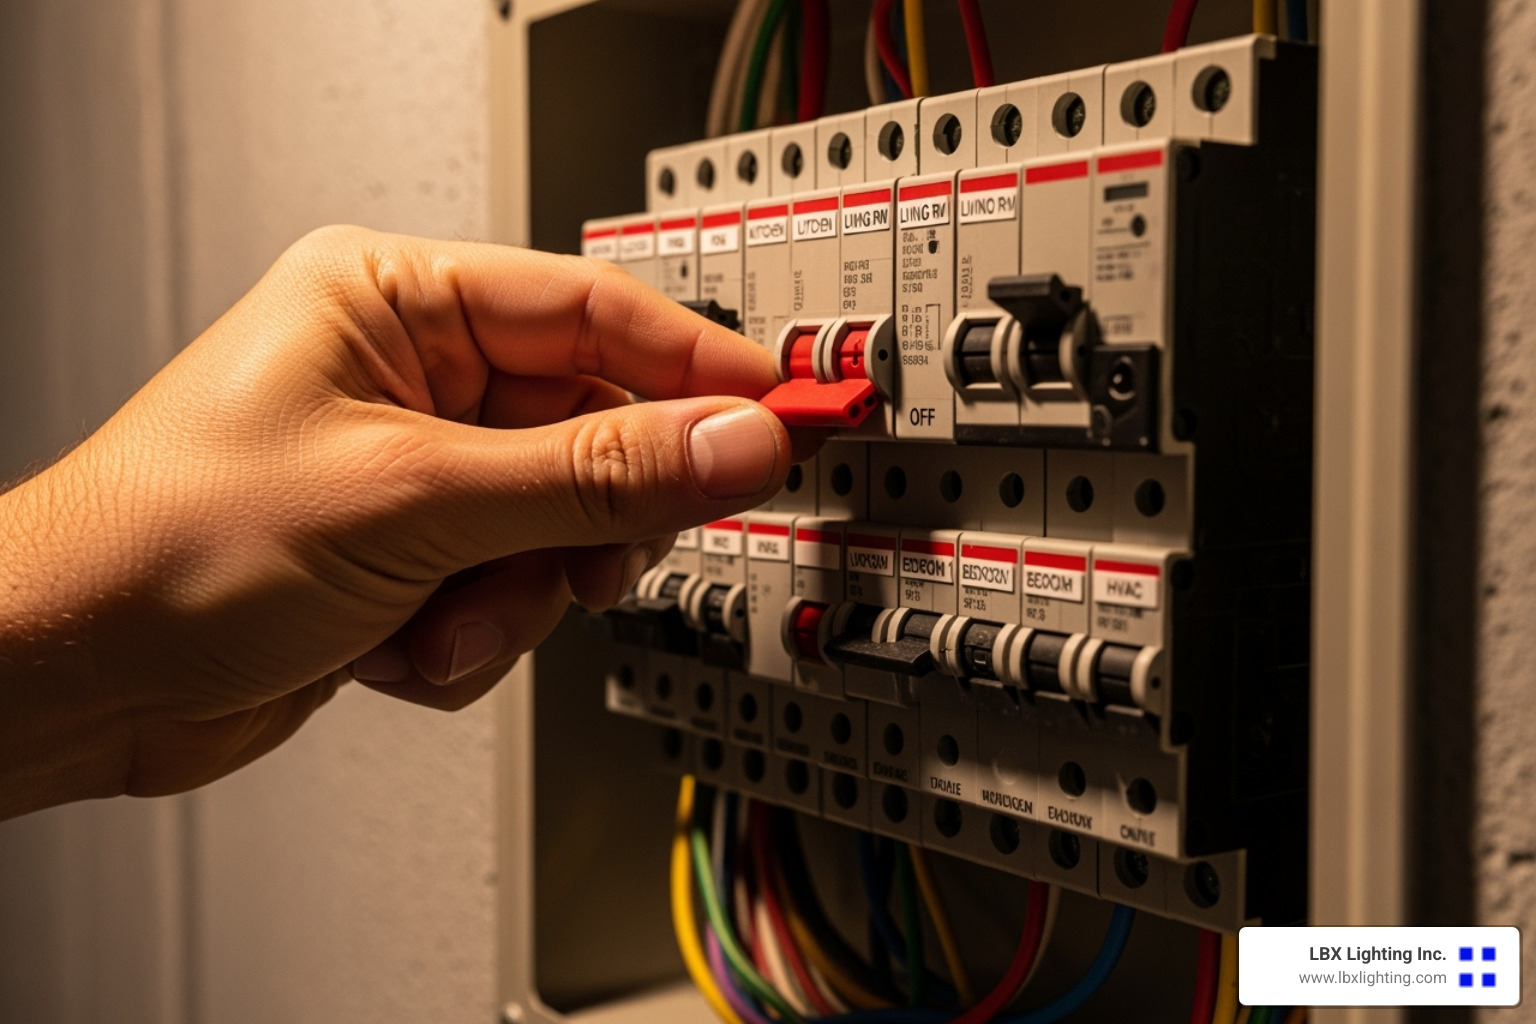
Before you even think about touching any wires or starting work, you absolutely must turn off the power to the area where you’ll be installing your lights.
Start by finding your main electrical panel – it’s usually tucked away in your basement, garage, utility closet, or mounted outside your home. Once you’ve located it, you’ll need to identify the correct circuit breaker for the room you’re working in. Look for labels that tell you which breaker controls which area. If the labels are faded, missing, or just plain confusing (we’ve all been there), you might need to flip the main breaker to cut power to the entire house.
Flip that breaker to the “OFF” position and put a piece of tape over it with a note warning others not to turn it back on. Trust me, you don’t want someone flipping it back on while you’re elbow-deep in wires.
Here’s the critical part: always confirm the power is actually off. Head back to your work area and use your non-contact voltage tester on an existing outlet or light switch. If that little tester lights up or beeps, there’s still power flowing, and you need to march back to that panel and find the right breaker. Test multiple times – it’s better to be overly cautious than sorry.
If you’re feeling uncertain about any part of this electrical safety dance, there’s absolutely no shame in calling a licensed electrician. For more detailed guidance on wiring safety, check out this comprehensive guide that covers all the essential safety protocols.
Step 2: Mark and Cut the Ceiling Tiles
With the power safely turned off, we can now focus on preparing your drop ceiling tiles for their new lighting fixtures. This step requires patience and precision – rushing here can lead to jagged cuts that’ll haunt you every time you look up.
Start by carefully removing the ceiling tile where you plan to install your first light. Gently lift and slide it out of the grid system, then place it on a clean, flat work surface. Working on a stable surface makes all the difference for getting clean, accurate cuts.
Next, you’ll need to find the exact center of the tile. Measure from all four edges or use the diagonal method – measure corner to corner and mark where those lines intersect. This center point is where your light will shine brightest.
Most recessed light fixtures come with a paper template or have the required hole size printed right on the packaging. Place this template centered on your marked point and trace around it with your pencil. If you don’t have a template, use the fixture itself as a guide, but be extra careful to keep it perfectly centered.
Now comes the cutting part. Use your utility knife for softer fiberboard tiles – score the line multiple times rather than trying to cut through in one pass. For denser materials, a keyhole saw will give you better control and cleaner edges. Take your time here – a snug fit is what we’re after. If your hole ends up a bit too large, don’t panic – that’s what goof ring trims are made for.
Once you’ve finished cutting, brush away any loose particles from the opening. Set the prepared tile aside carefully – we’ll be reinstalling it later once the support structure and wiring are in place.
Step 3: Install the Support Structure
Here’s where how to install recessed lighting in drop ceiling gets really interesting. This step is absolutely crucial because drop ceiling tiles are designed to look good and absorb sound – they’re definitely not built to support the weight of light fixtures. Skip proper support, and you’ll end up with saggy tiles that look terrible and could eventually fail completely.
The key is transferring the weight from those flimsy tiles to the sturdy metal grid system or, even better, directly to the structural ceiling above. Think of it this way – you wouldn’t ask a piece of cardboard to do push-ups, so don’t ask your ceiling tiles to support heavy fixtures.
If you’re using canless LED fixtures, T-grid mounting plates are your best friend. These specially designed plates rest directly on the metal T-bars of your ceiling grid, creating a rock-solid platform for your light. Install them so the light sits flush with the tile surface for that clean, professional look.
For traditional canned lights, look for “new work” housings with adjustable support bars. These clever devices extend across your ceiling grid and have clips that snap directly onto the T-bars. The entire fixture hangs securely from the grid system, not from the tile itself. Avoid “remodel cans” with small clips that attach to the tile – they’re a recipe for sagging disasters.
For extra security, especially with heavier fixtures, consider running independent support wires from the structural ceiling above directly to your fixture. NEC Article 410.16(C) covers the requirements for supporting light fixtures in suspended ceilings, emphasizing that support must be properly secured to the actual ceiling structure. While this might seem like overkill, it’s often required by local codes and provides that extra peace of mind.
The bottom line? Make your ceiling grid do the heavy lifting, not your tiles. Your future self will thank you when everything stays perfectly aligned and professional-looking for years to come.
Step 4: Wire the Fixtures
Now we’re getting to the electrical heart of the project – the part that transforms your carefully planned layout into actual light. This is where precision and safety go hand in hand.
If you’re running new electrical wire (Romex/NM cable), it’s usually easiest to rough it in before you replace those ceiling tiles. Since drop ceilings are removable, you can install junction boxes above the ceiling and feed your Romex to these locations. Leave yourself plenty of extra cable length at each light location – trust me, having too much wire is way better than coming up short when you’re trying to make connections.
Each recessed light fixture comes with its own integral junction box with removable knockouts. Carefully remove one of these knockouts and guide your supply cable through the opening. Strip back the cable sheathing just enough to expose the individual wires, but not so much that bare copper is hanging outside the box.
Here’s where the magic happens – connecting the wires correctly. Inside that junction box, you’ll find the fixture’s leads waiting to meet your supply wires. Black hot wire connects to black hot wire, white neutral connects to white neutral, and most importantly, green or bare copper ground connects to green or bare copper ground. Always connect the ground wire first – it’s your safety net.
Twist those corresponding wires together firmly and cap them with appropriately sized wire connectors. Once all connections are secure, gently tuck everything into the junction box and close the cover. Be careful not to pinch any wires – they need room to breathe.
Now here’s the reality check: most municipalities require a licensed electrician to make the final connection to your main electrical panel and inspect the work. While you can handle much of the installation yourself, that final connection and inspection needs professional expertise. It’s not just about following the law – it’s about keeping your family safe.
If you’re not completely comfortable with any part of the electrical work, please don’t hesitate to call in a certified electrician. At LBX Lighting Inc., we can help connect you with trusted professionals in the Houston area who can handle these critical connections safely and ensure everything meets code. For specific fixture needs, explore our Recessed Canned Lighting collection to find the perfect match for your project.
Finishing Touches and Common Pitfalls
We’re in the home stretch! With the hard work done, it’s time to complete the project and learn what mistakes to avoid for a flawless finish. This is where your careful planning and preparation really pay off.
Step 5: Install the Fixture and Trim
The moment of truth has arrived. After all that measuring, cutting, and wiring, we get to see our how to install recessed lighting in drop ceiling project come together.
Start by positioning your prepared ceiling tile back into its spot in the grid system. Tile you carefully cut earlier? Gently slide it back into place, making sure it sits properly in the T-bar framework. The cut hole should align perfectly with your support structure.
Next, guide your recessed light fixture through the opening. Take your time here – you don’t want to force anything or scratch the fixture against the tile edges. If you’re working with a canless LED fixture, it should slide through smoothly and rest on your T-grid mounting plate. For canned lights with new work housings, the fixture will hang from the support bars you installed earlier.
Secure the fixture to your support system. This step varies depending on your fixture type, but the goal is the same – ensure everything sits snugly and flush with the ceiling tile surface. If you’re using clips that pivot and press against the grid, use a screwdriver to engage them fully. The fixture should feel solid and stable, with no wobbling or sagging.
Time to add the bulb (if your fixture uses a separate one). Handle any bulb by its base or rim – those skin oils from your fingers can create hot spots on traditional bulbs and shorten their lifespan. Integrated LED fixtures skip this step entirely, which is one reason they’re so popular for drop ceiling applications.
Finally, attach the trim ring – the decorative piece that gives your installation that clean, professional look. This trim should snap or screw onto the fixture rim and sit flush against the ceiling tile. If your hole ended up slightly larger than planned, don’t panic! Goof rings are your safety net – these handy accessories can mask minor imperfections before you install the regular trim.
The big moment: restore power and test! Head back to your electrical panel and flip that circuit breaker to “ON.” Watch as your newly installed lights illuminate your space. There’s something deeply satisfying about flipping that switch for the first time!
Mistakes to Avoid
Even experienced DIYers can stumble on seemingly simple details. Learning from others’ mistakes can save you time, money, and frustration. Here are the most common pitfalls I’ve seen in my 30 years at LBX Lighting.
Improper support is the biggest culprit I encounter. I can’t stress this enough – drop ceiling tiles simply cannot support light fixture weight on their own. Using those “remodel cans” with clips that attach directly to tiles might seem easier, but you’ll end up with sagging, unsightly results. Always use proper T-grid mounting plates, support bars, or independent support wires.
Tile sagging happens faster than you’d think. Once a tile starts to bow under a fixture’s weight, it rarely recovers its original shape. You’ll be looking at that droopy ceiling every day, wondering why you didn’t spend the extra few minutes on proper support.
Overloading circuits is a serious safety concern. Adding multiple LED fixtures to an existing 15-amp circuit might seem fine, but circuit likely powers other things too. Calculate your total wattage carefully, and when in doubt, have an electrician assess your electrical capacity.
Cutting holes the wrong size creates headaches. Too small, and you’ll struggle to fit the fixture, potentially cracking or damaging the tile. Too large, and even generous trim rings might not cover the gaps. Measure your fixture’s specifications carefully and cut conservatively – you can always enlarge a hole, but you can’t shrink it.
Ignoring local electrical codes can lead to failed inspections and expensive rework. What’s acceptable in one area might violate codes in another. Always check with your local authorities about specific requirements for fixture support and wiring methods in suspended ceilings.
Poor spacing creates uneven lighting that makes rooms feel unbalanced. Stick to your layout plan and measure twice. Those extra minutes spent ensuring consistent spacing will pay dividends in how your finished space looks and feels.
Key Differences: How to Install Recessed Lighting in a Drop Ceiling vs. Drywall
Understanding how drop ceiling installation differs from standard drywall work helps you appreciate why this project is actually more DIY-friendly than you might expect.
| Feature | Drop Ceiling Installation | Standard Drywall Ceiling Installation |
|---|---|---|
| Support Method | Requires independent support from the grid (T-grid plates, support bars, new work housing clips) or structural ceiling above. Tiles do not bear weight. | New construction: Fixtures attach directly to ceiling joists. Remodel: Fixtures attach to drywall with spring-loaded clips. |
| Cutting Tools | Utility knife or keyhole saw for ceiling tiles. | Hole saw for precise circular cuts in drywall. |
| Fixture Mounting | Often involves clips that snap onto the metal T-bars of the grid, or plates that rest on the grid. | Clips secure to the back of the drywall, or housing is nailed/screwed to joists. |
| Access to Wiring | Easy! Tiles are removable, providing open access to the space above the ceiling for running wires and making connections. | Limited access. Requires attic/crawlspace access, or cutting larger holes for wire fishing and patching. |
| Repairability | High. Individual tiles can be easily removed and replaced if damaged or if changes are needed. | Low. Repairing holes or making changes requires patching, mudding, sanding, and painting. |
The biggest advantage of drop ceilings is accessibility. When you need to run wiring or make adjustments, simply lift out the relevant tiles. Compare that to crawling around in an attic or cutting exploratory holes in drywall – drop ceilings are definitely more forgiving for DIY projects.
Fixture mounting differs significantly between the two ceiling types. With drywall, you’re either screwing into solid joists or relying on clips that grip the drywall itself. Drop ceilings require transferring the fixture weight to the metal grid system, which is actually more reliable once properly installed.
The repair factor alone makes drop ceilings attractive for lighting projects. Damage a drywall ceiling during installation, and you’re looking at patching, sanding, priming, and painting. Damage a drop ceiling tile, and you simply replace that one tile – no matching paint or texture work required.
Frequently Asked Questions about Drop Ceiling Lighting
We’ve covered a lot of ground, but you might still have some lingering questions. After three decades of helping Houston homeowners with their lighting projects, I’ve heard just about every question you can imagine about how to install recessed lighting in drop ceiling applications. Here are the answers to the most common concerns that come up time and again.
Can I install recessed lights without using extra supports?
This is probably the question I get asked most often, and my answer is always the same: absolutely not. I can’t stress this enough – it’s not just a recommendation, it’s a necessity for both safety and aesthetics.
Drop ceiling tiles are lightweight and designed for one thing: looking good while providing acoustic benefits. They’re made from materials like mineral fiber or fiberglass that simply weren’t engineered to bear the weight of light fixtures. Think of them like decorative paper – they’re perfect for their intended job, but you wouldn’t hang a picture frame from a sheet of paper, right?
You must use a support system like T-grid mounting plates or support bars that transfer the weight to the ceiling grid, or wire the fixture independently to the structure above. Without proper support, you’re looking at sagging tiles, cracked panels, and potentially a fixture crashing down. Trust me, I’ve seen the aftermath of shortcuts, and it’s not pretty.
What type of recessed light is best for a drop ceiling?
LED recessed lights are hands down the best choice for drop ceiling installations. After years of working with different fixture types, LEDs consistently deliver the best results for several reasons.
First, they run significantly cooler than traditional incandescent or halogen lights. This matters tremendously in a drop ceiling environment where heat can damage tiles or create safety concerns. LEDs also offer incredible energy efficiency and lifespans that often exceed 25,000 hours – that’s years of maintenance-free lighting.
For the actual fixture style, “new work” housings with built-in clips that snap directly onto the T-bars of your ceiling grid are fantastic choices. They’re designed specifically for this type of installation and provide rock-solid support. Alternatively, canless LED fixtures paired with T-grid mounting plates offer a sleek, modern look with equally secure installation.
The key is choosing fixtures that work with your ceiling system, not against it. Avoid those tempting “remodel cans” with clips that attach directly to tiles – they might seem easier, but they’ll cause problems down the road.
Do I need an electrician to install recessed lighting?
This is where I always tell folks to be honest about their comfort level with electrical work. While you can absolutely handle many of the mechanical steps yourself – planning the layout, cutting holes in tiles, installing support structures – the electrical wiring is where things get serious.
Most municipalities require a licensed electrician to make the final connection to your home’s main electrical panel and inspect the work to ensure it meets local codes. Even if you’re handy with tools, electrical codes are complex and vary by location. What’s acceptable in one area might violate codes in another.
For safety and code compliance, it’s always best to hire a professional for any wiring you’re not 100% comfortable with. The mechanical installation? Go for it! Running new circuits or connecting to your main panel? That’s electrician territory. At LBX Lighting, we often work with customers who tackle the prep work themselves and then bring in our recommended electricians for the final connections. It’s a great way to save money while ensuring everything is done safely and up to code.
The bottom line is this: there’s no shame in knowing your limits. A properly installed lighting system is worth the investment in professional help when you need it.
Illuminate Your Space with Confidence
You’ve made it to the finish line! Learning how to install recessed lighting in drop ceiling is truly one of those rewarding DIY projects that makes you step back and think, “I actually did that.” The change from a basic drop ceiling to a sleek, professionally lit space is nothing short of amazing.
The beauty of this project goes beyond just the visual impact. You’ve gained precious headroom compared to traditional hanging fixtures, created a modern aesthetic that works in any setting, and added real value to your space. Whether it’s a basement family room, home office, or commercial area, recessed lighting brings that polished look that makes everything feel more upscale.
The key to success lies in proper planning and execution. Remember those critical steps we covered: choosing the right LED fixtures, creating a solid support system, and never skipping safety protocols. These aren’t just suggestions – they’re the difference between a professional-looking installation and a project you’ll regret.
At LBX Lighting Inc., we’ve been Houston’s trusted lighting partner for over 30 years, and I’ve seen countless homeowners transform their spaces with confidence. What sets us apart isn’t just our competitive pricing or quality products – it’s our commitment to making sure you have everything you need to succeed, from expert guidance to the right fixtures for your specific project.
Your drop ceiling lighting project is an investment in your space and your skills. With the knowledge you’ve gained from this guide, you’re equipped to tackle this home improvement challenge head-on. Just remember to lean on professionals for the electrical connections and code compliance – that’s not cutting corners, that’s being smart.
Ready to bring your vision to life? Explore our complete range of Recessed Lighting Solutions and find how LBX Lighting can help you illuminate your space with confidence. Your perfectly lit room is just a project away!


